Terra Oracle AI Portal - User Guide
Terra Oracle AI Portal - User Guide
Table of Contents
- Introduction
- Overview
- Getting Started
- Dashboard and Navigation
- Fields
- Data Uploads and Scans
- Field Intelligence
- VRA Maps (Prescription Files)
- AI Advisor
- Account Settings
- Notifications
- Troubleshooting
- Support and Feedback
- Conclusion
Introduction
This guide helps farmers, agronomists, consultants, and team members use the Terra Oracle AI Portal for field setup, data upload, analysis, collaboration, and prescription planning.
The portal is organized around fields. You start by setting up your account and fields, connect data sources, review field intelligence, discuss agronomic questions with AI Advisor, and create VRA outputs for operational use.
Overview
Terra Oracle AI Portal is a precision agriculture platform focused on:
- Field setup and boundary management
- Soil and external agronomic data upload
- Field-level analysis and map interpretation
- Weather, NDVI, soil, lab, and VRA layer review
- AI-assisted agronomic interpretation and decision support
- Variable Rate Application (VRA) planning and export
- Team collaboration, notifications, and organization management
Core Terms
- Field Intelligence: The main analysis workspace organized around fields
- VRA Map / Prescription File: A zone-based application plan for field operations
- Management Zone: An area in a field with a specific target rate
- Application Rate: The planned amount to apply within a zone
- AI Advisor: The conversational agronomy assistant that interprets your field data
Typical End-to-End Workflow
- Sign up and sign in to the portal.
- Complete account setup, including profile details, app installation, notifications, and organization setup if needed.
- Add field boundaries by uploading a shapefile, drawing on the map, or importing from a connected platform.
- Upload field data such as Terra Oracle AI Scanner data, soil analysis rasters, lab data, or other external datasets.
- Connect third-party platforms through Third-Party Logins when you want to import fields, synchronize operations data, or export outputs.
- Review your coverage and subscriptions in billing if you need analysis beyond the free hectare allowance or want to enable AI features.
- Review layers and analysis in Field Intelligence.
- Use AI Advisor for interpretation, insight generation, and decision support when your AI subscription is active.
- Create VRA plans and export them as files or send them to connected platforms when available.
- Contact support for help, questions, or feature requests.
Access, Coverage, and Subscriptions
The portal supports a free Field Intelligence tier up to a limited number of covered hectares. If your organization wants to use Field Intelligence beyond that free allowance, a Field Intelligence subscription is required.
AI Advisor is a separate paid capability. To use AI Advisor, your organization needs an active AI subscription. AI usage is then governed by the available AI Credits included with the subscription and added through top-ups.
Getting Started
System Requirements
- Stable internet connection
- Recommended screen resolution of
1024x768or higher - For voice or push features: a supported browser and device permissions
Supported Browsers
We support up-to-date versions of the following browsers:
Desktop
- Chrome
- Edge
- Safari (macOS)
- Firefox
Mobile
- Android: Chrome, Samsung Internet
- iOS: All browsers
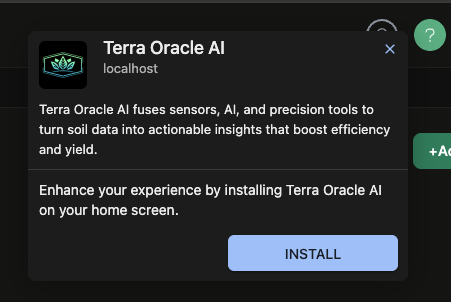
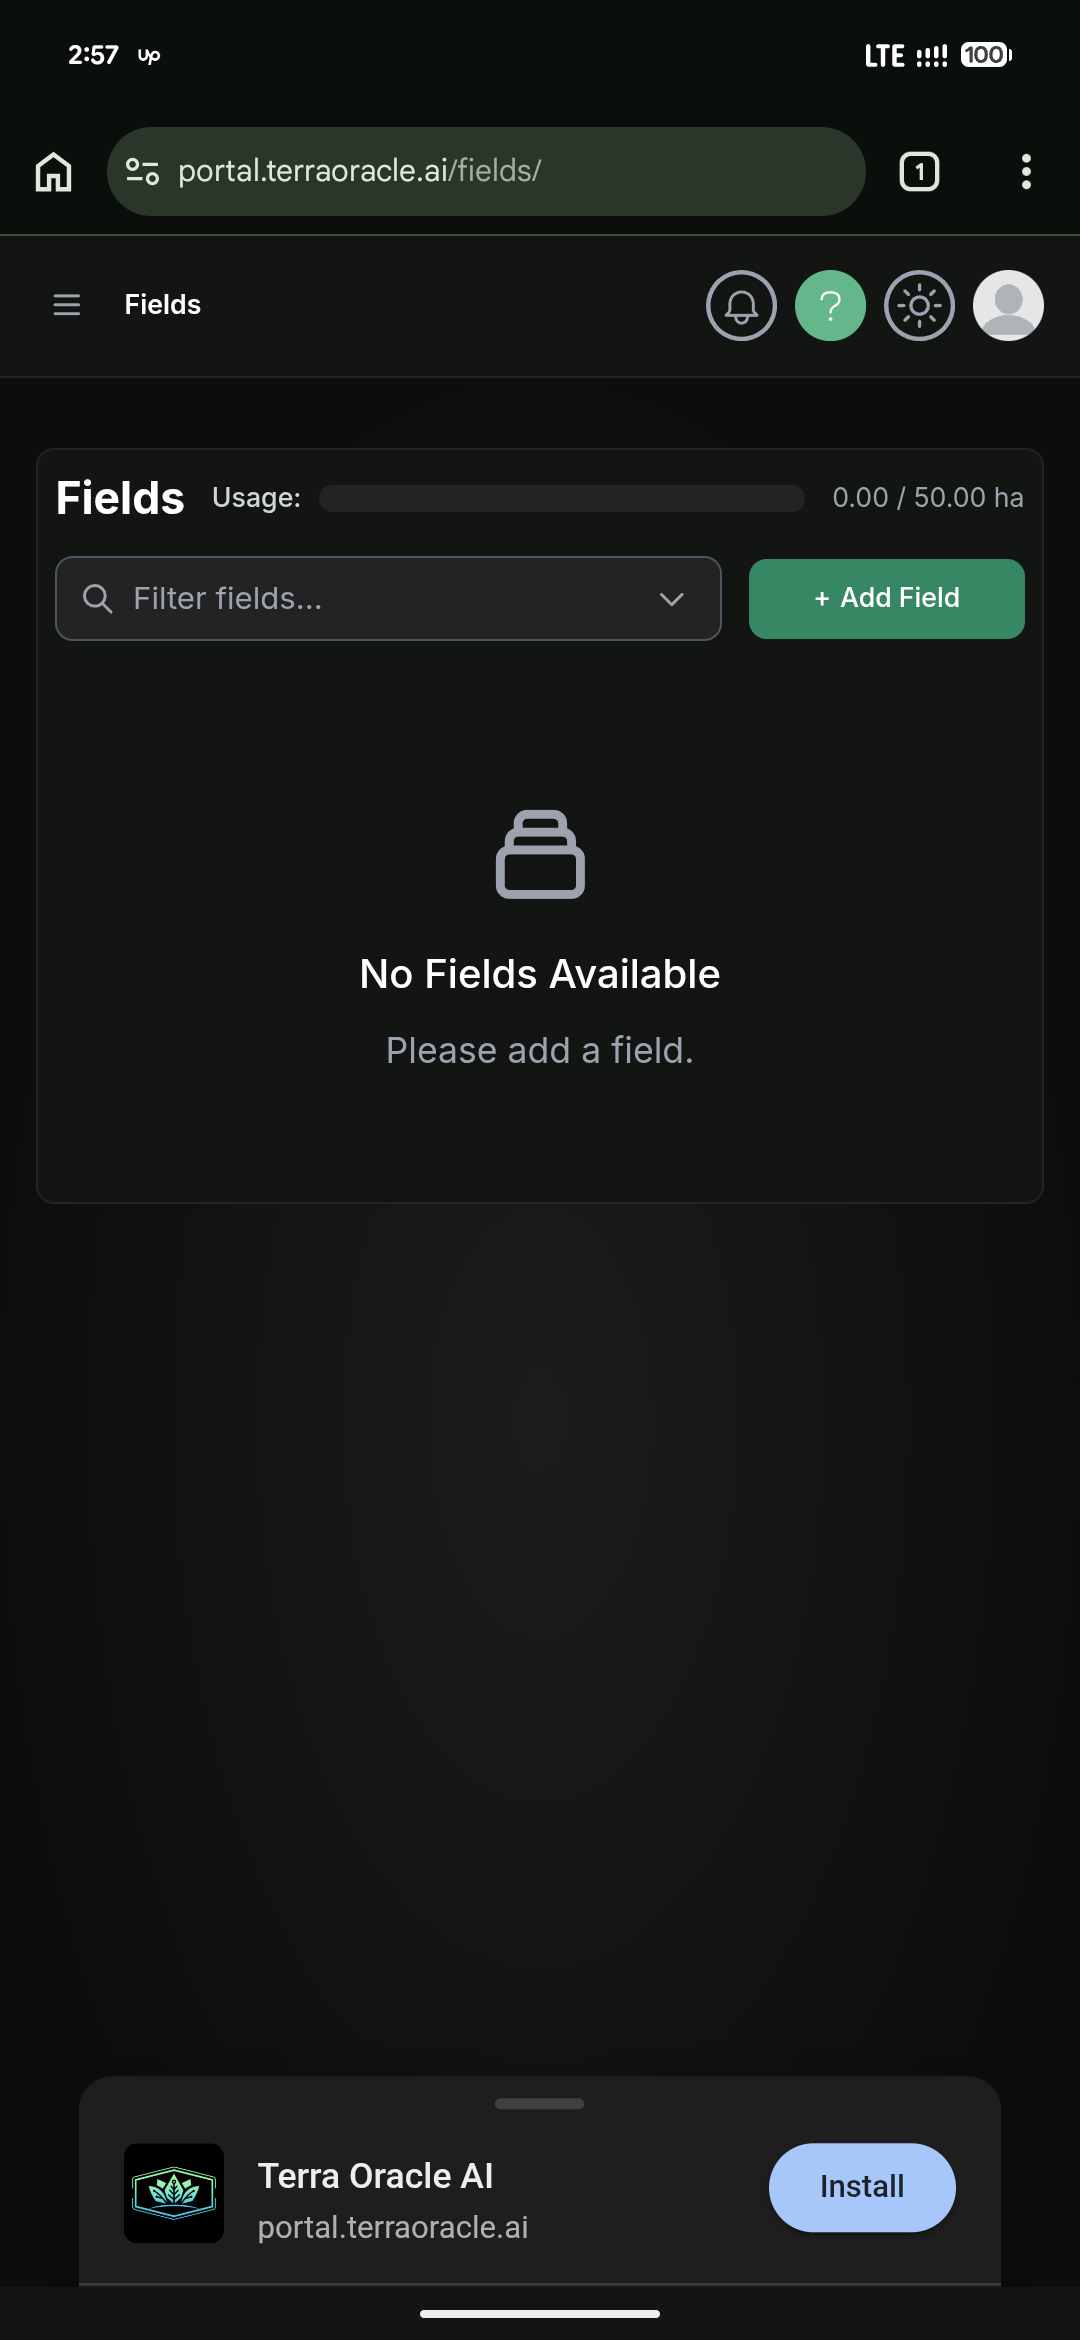
Install the App
Terra Oracle AI Portal can be installed as the Terra Oracle AI application on supported desktop and mobile devices. Installing the application gives a more native experience and is the best setup for device-based push notifications.
Install on Desktop
- Open Terra Oracle AI Portal in a supported browser.
- Look for the browser’s install option in the address bar or browser menu.
- Confirm the install.
- Launch the portal from your desktop or app launcher after installation.
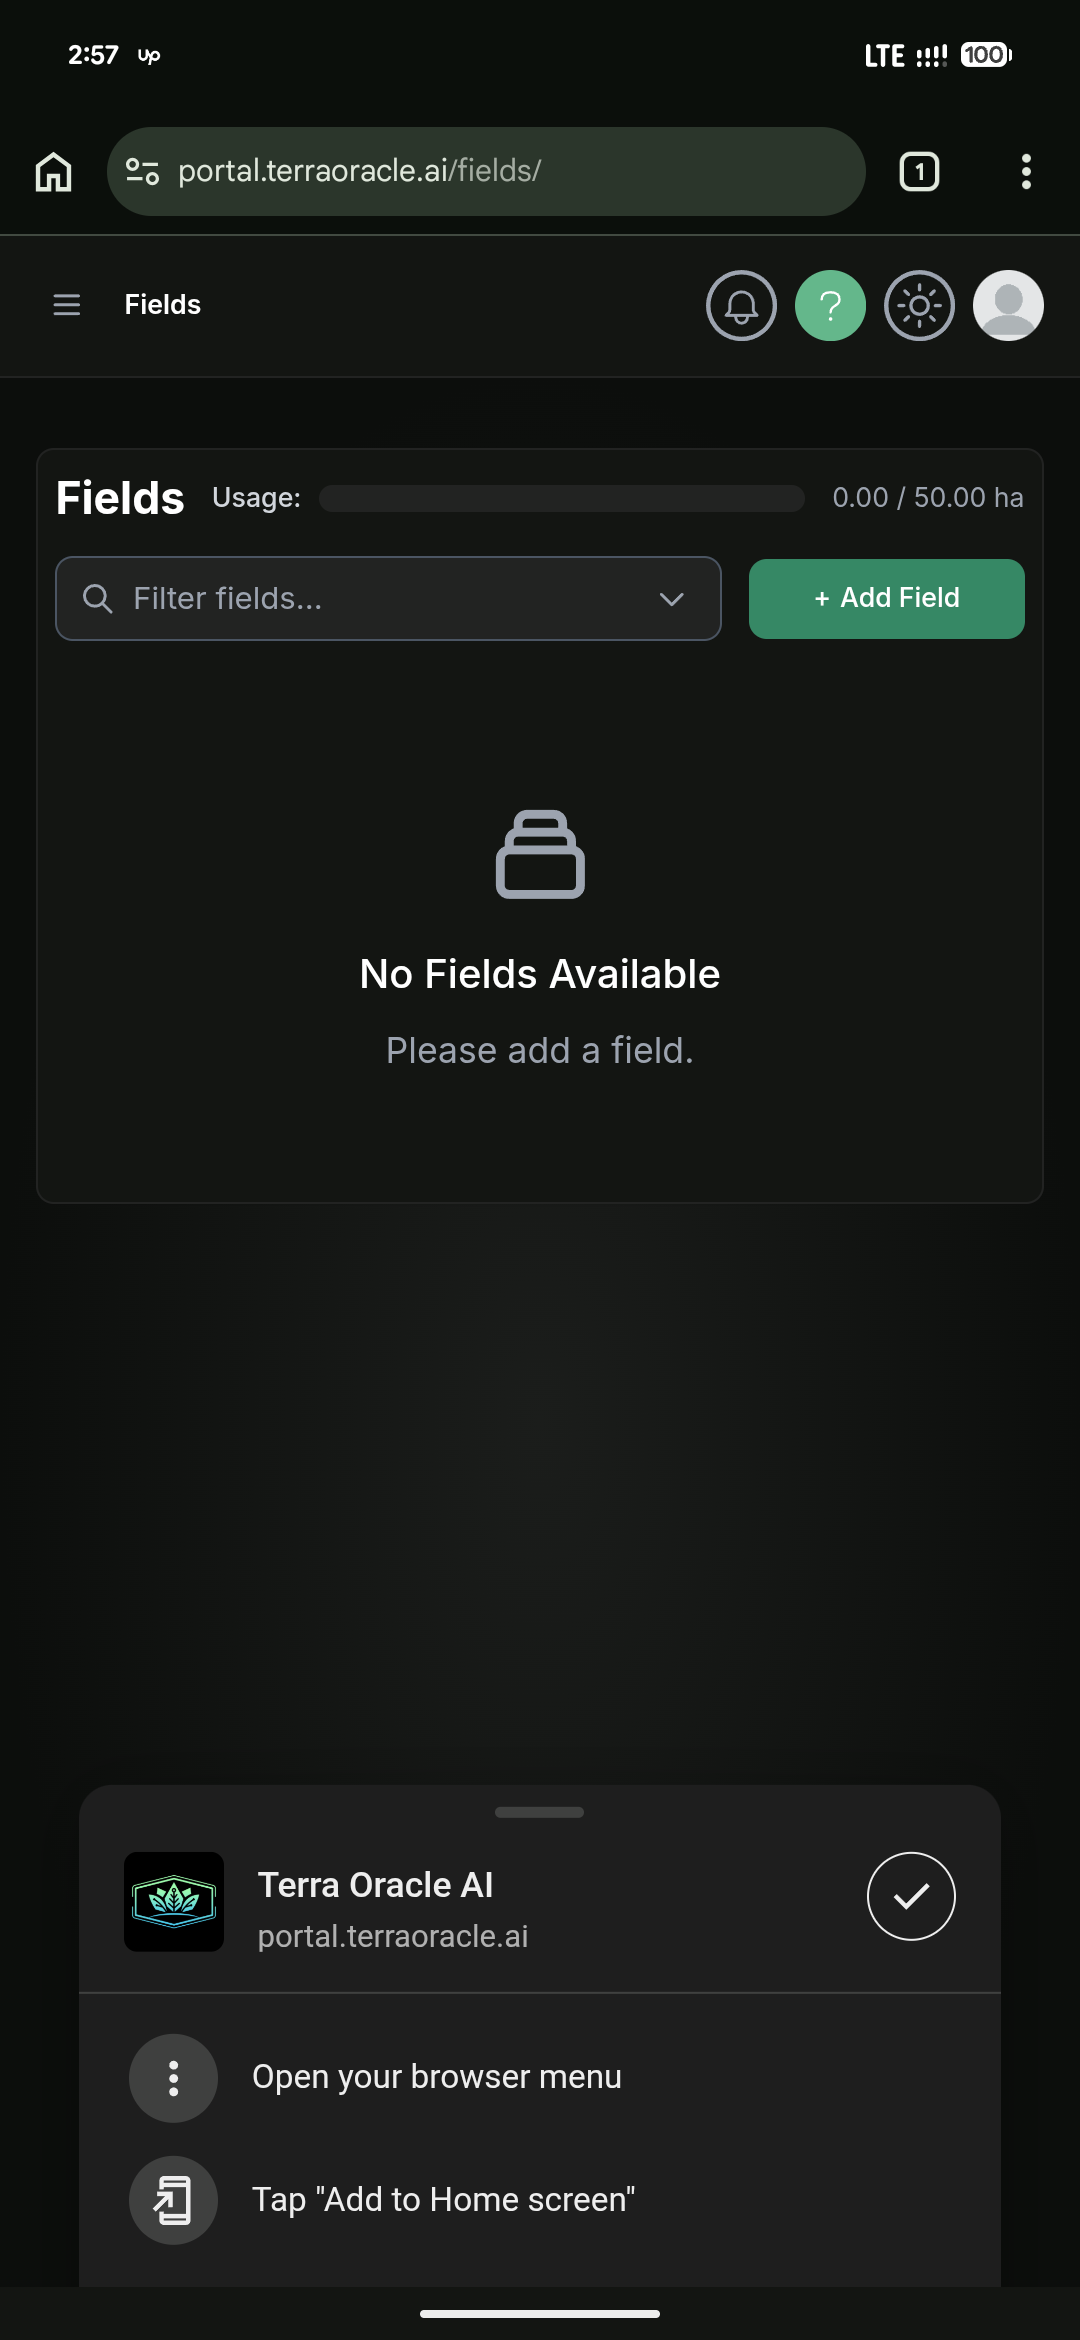
Install on Mobile
- Open Terra Oracle AI Portal in your mobile browser.
- Proceed with the installation as instructed on screen.
- Open the Terra Oracle AI application from your home screen.
Sign In
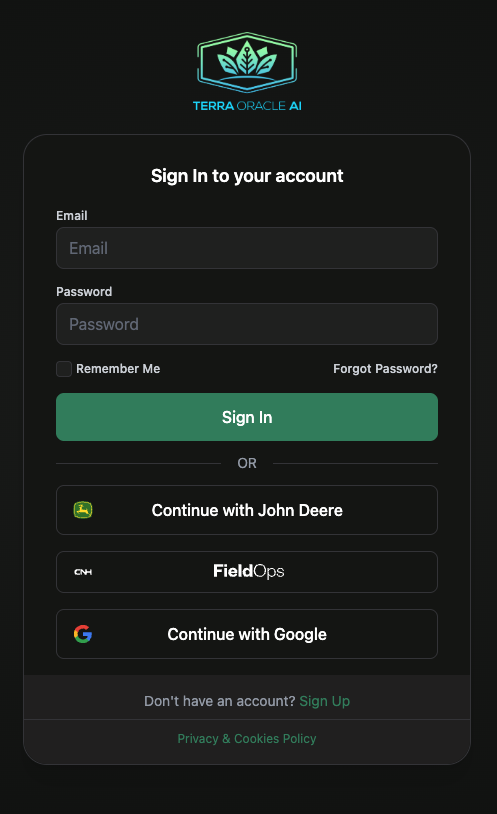
- Go to https://portal.terraoracle.ai/.
- Sign in with your email and password, or use a supported sign-in option.
- Complete any required verification or terms steps if prompted.
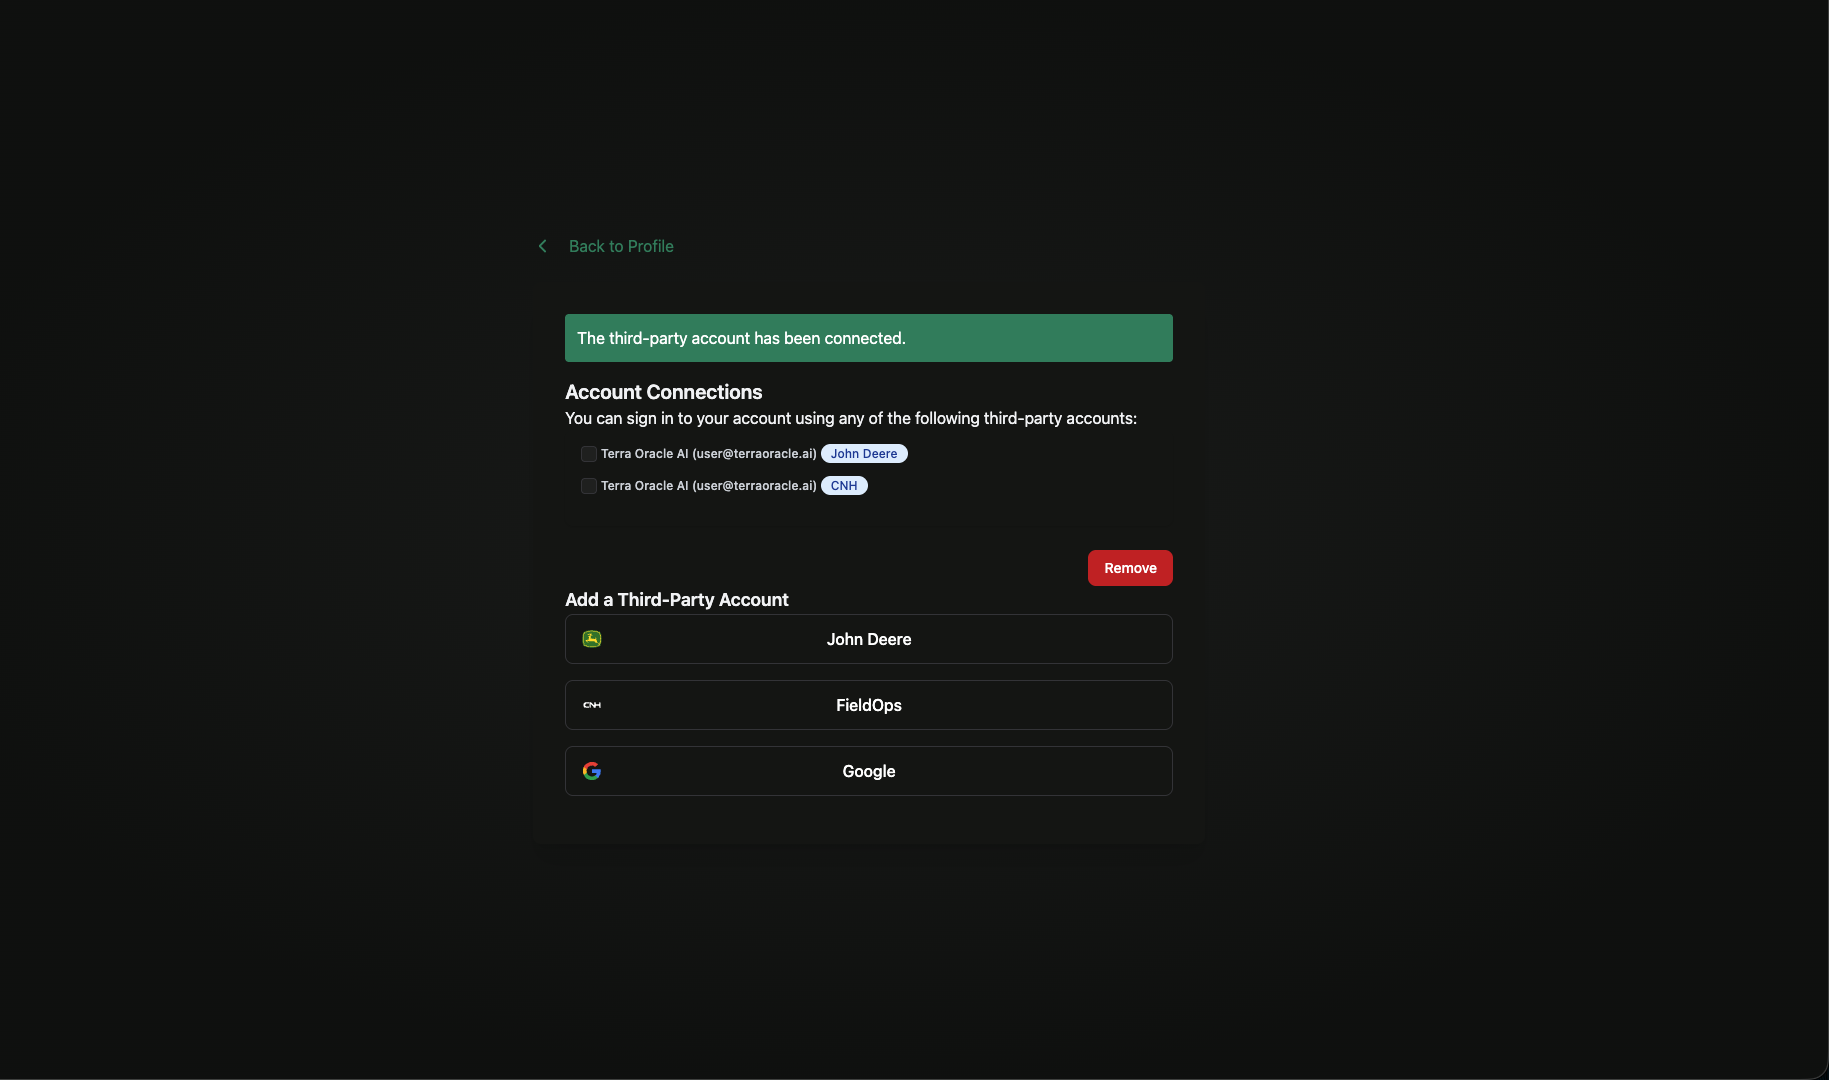
Third-Party Login Options
Depending on your account and integrations, the portal may offer:
- Continue with Google
- Continue with John Deere
- Continue with CNH
Use Third-Party Logins when you want to:
- Connect your account to supported platforms
- Import fields from connected platforms
- Synchronize supported field operations data
- Export supported outputs back to connected systems
Password Reset
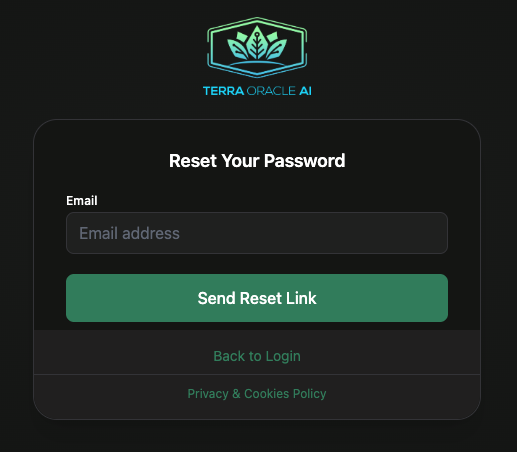
If you cannot sign in, use the password reset flow from the login screen and follow the email link.
First-Time Setup Checklist
Use this checklist after your first sign-in:
- Review your profile details in Account Settings.
- Install the Terra Oracle AI application on your desktop or phone if you plan to use notifications regularly.
- Configure Notification Preferences and subscribe your current device for push notifications if desired.
- Connect Third-Party Logins if you plan to import fields or synchronize data.
- Invite colleagues to your organization if you work as a team.
- Add your first field and boundary.
- Review Billing if your organization needs more Field Intelligence coverage or wants to enable AI Advisor.
- Upload your first Terra Oracle AI Scanner or external dataset.
- Open Field Intelligence and validate the available layers.
Dashboard and Navigation
Left Sidebar
The main navigation usually includes:
- Scans
- Field Intelligence
- VRA Maps
- Fields
- Account Settings
Some users may see additional items based on their role.
Top Navigation
The top navigation typically includes:
- Theme toggle
- Support widget
- User menu
- Quick access to account actions such as profile, organization, billing, and sign out
Responsive Behavior
- On desktop, you see the full navigation and broader analysis layouts.
- On smaller screens, navigation and controls may collapse or stack.
- For heavy map work, a desktop or tablet experience is recommended.
Fields
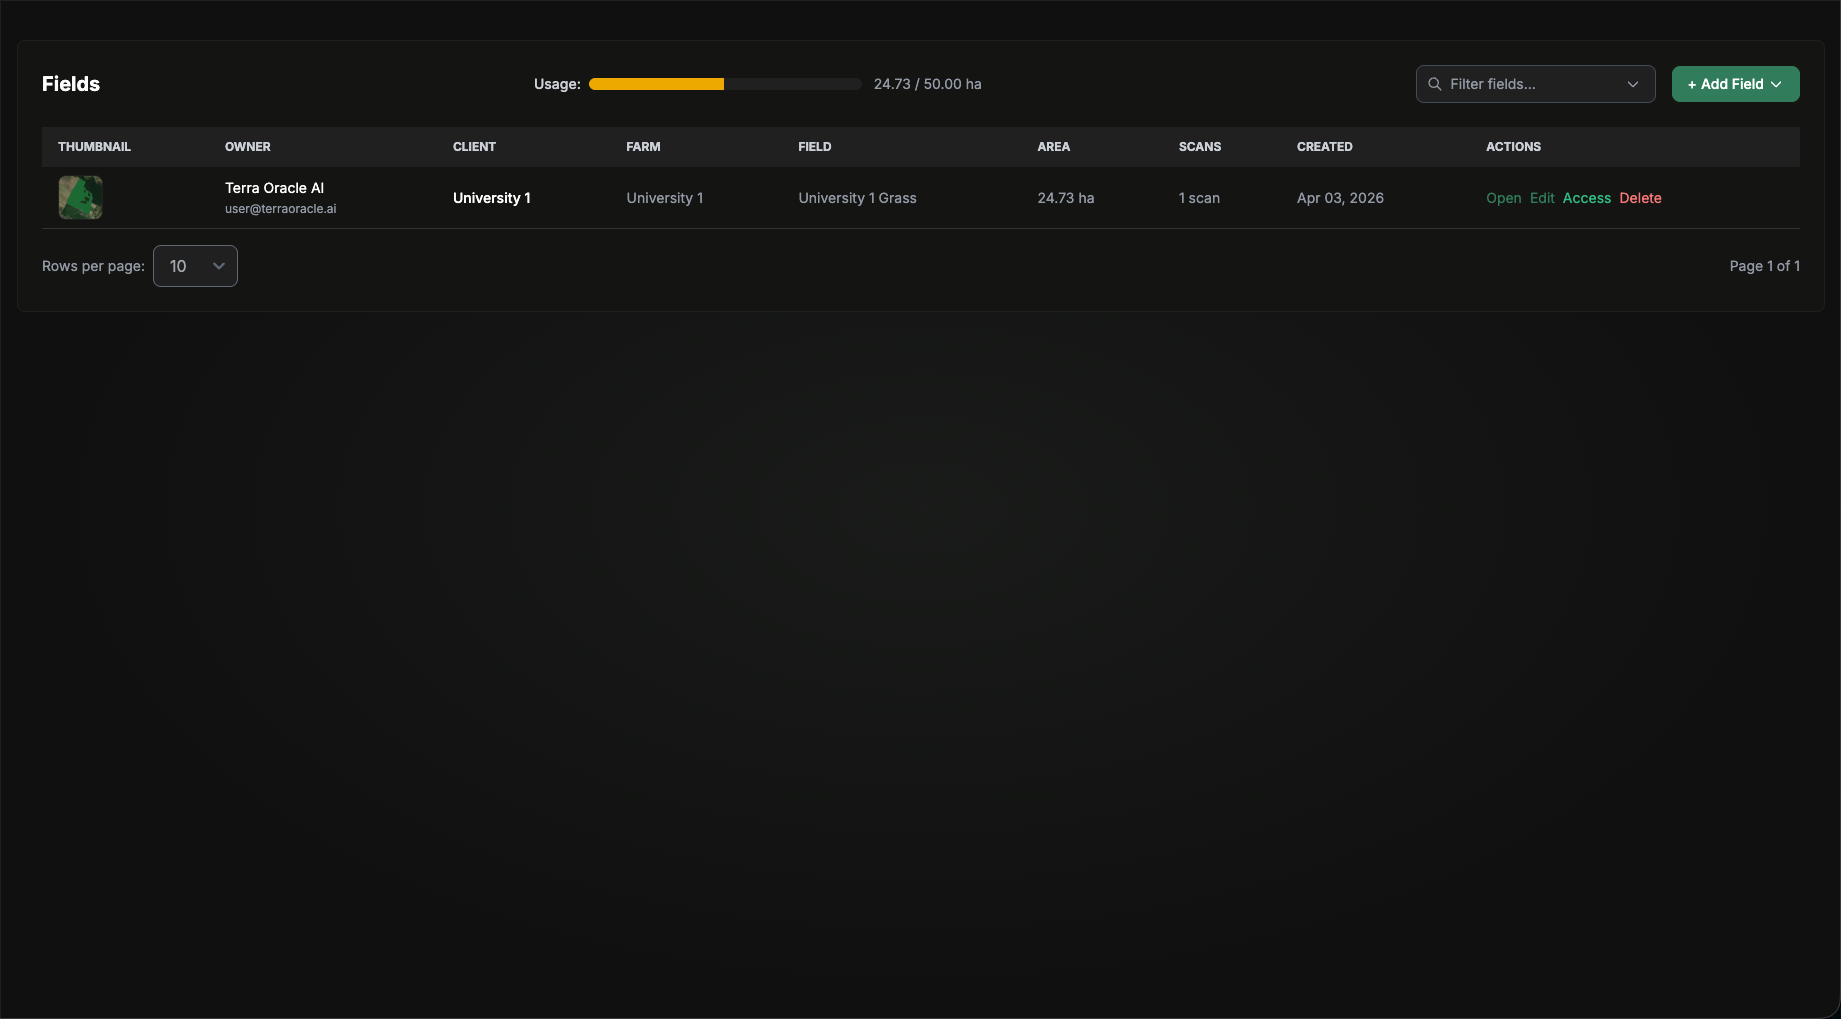
Use the Fields area to manage boundaries, field metadata, and sharing.
What You Can Do
- Add fields
- Edit field details
- Upload or adjust boundaries
- Import fields from supported connected platforms
- Manage field sharing and access
- Delete fields when allowed by your role
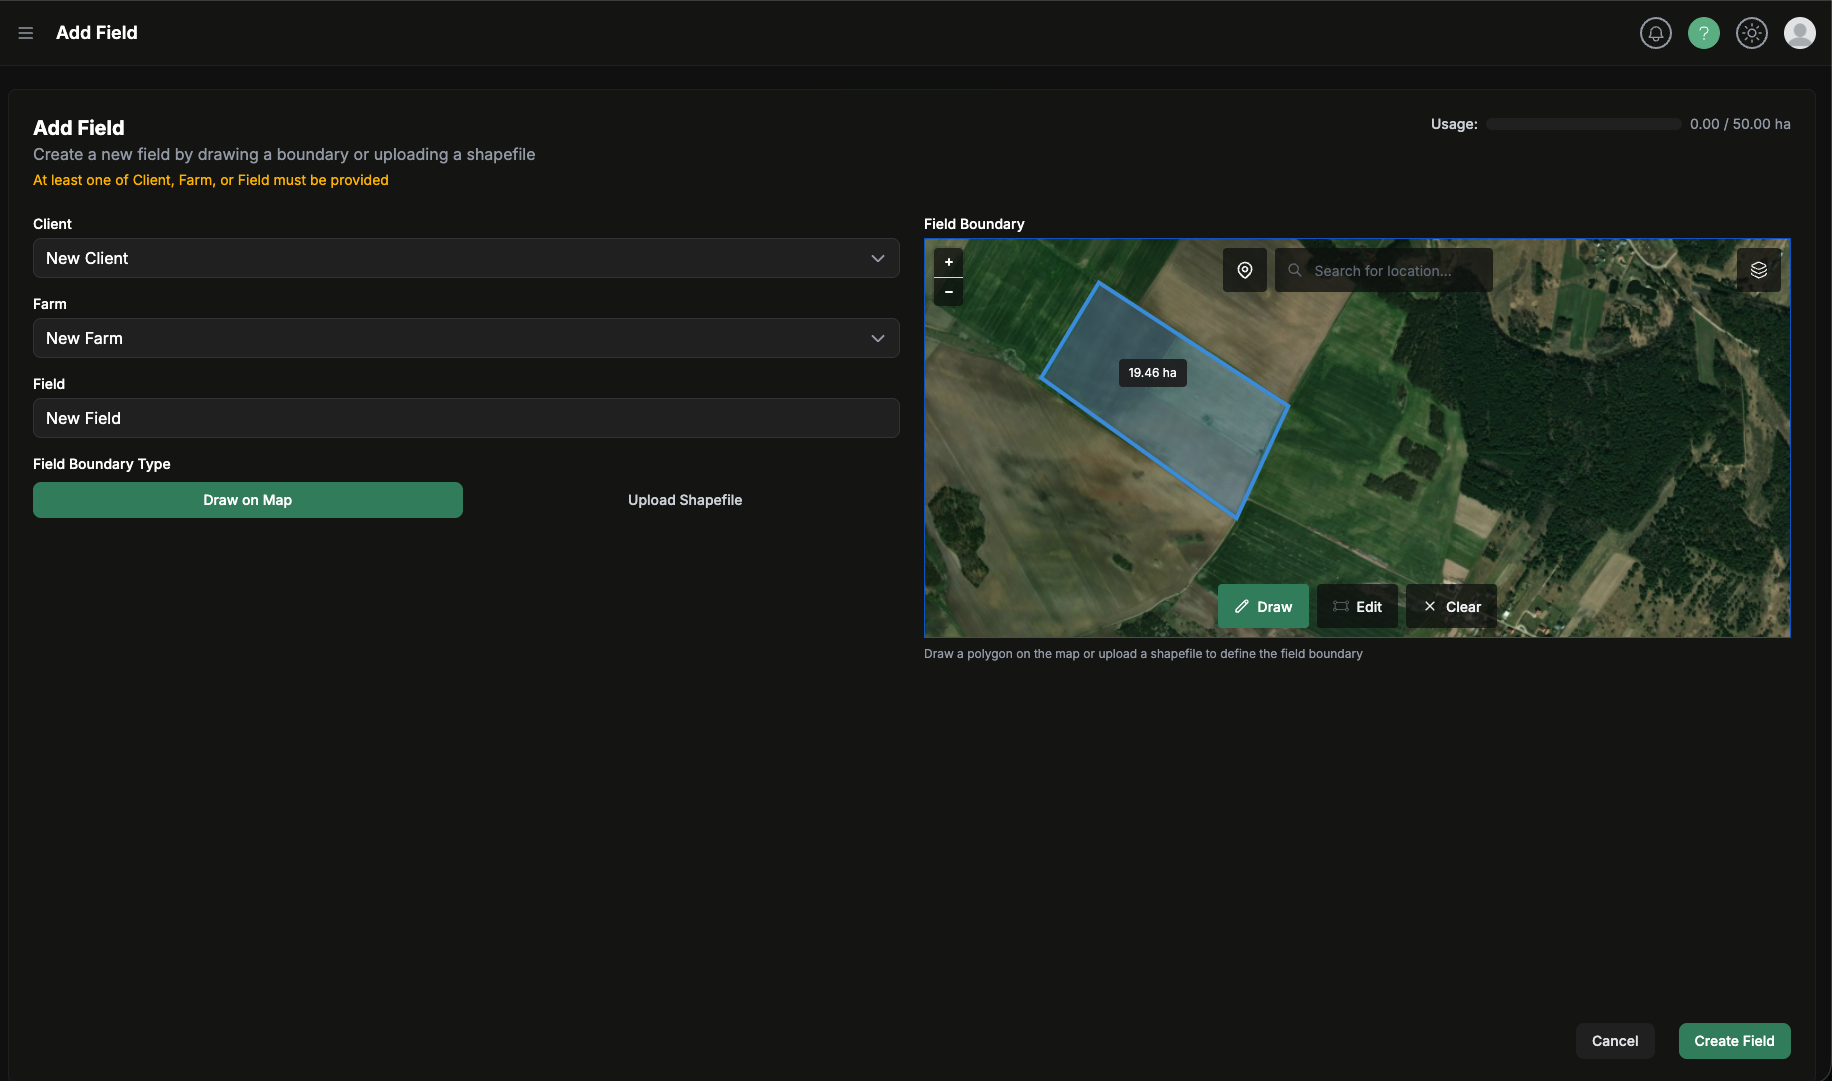
Add a Field
You can add fields in three main ways:
- Upload a shapefile
- Draw the field on the map
- Import from a connected platform
Option 1: Upload a Shapefile

- Click Add Field.
- Choose the shapefile upload option.
- Upload the boundary file.
- Review and complete the client, farm, and field name.
- Review the boundary preview.
- Click Create Field.
Option 2: Draw on the Map
- Click Add Field.
- Enter the client, farm, and field name.
- Choose the draw-on-map option.
- Draw the boundary directly on the map.
- Review the resulting area and shape.
- Click Create Field.
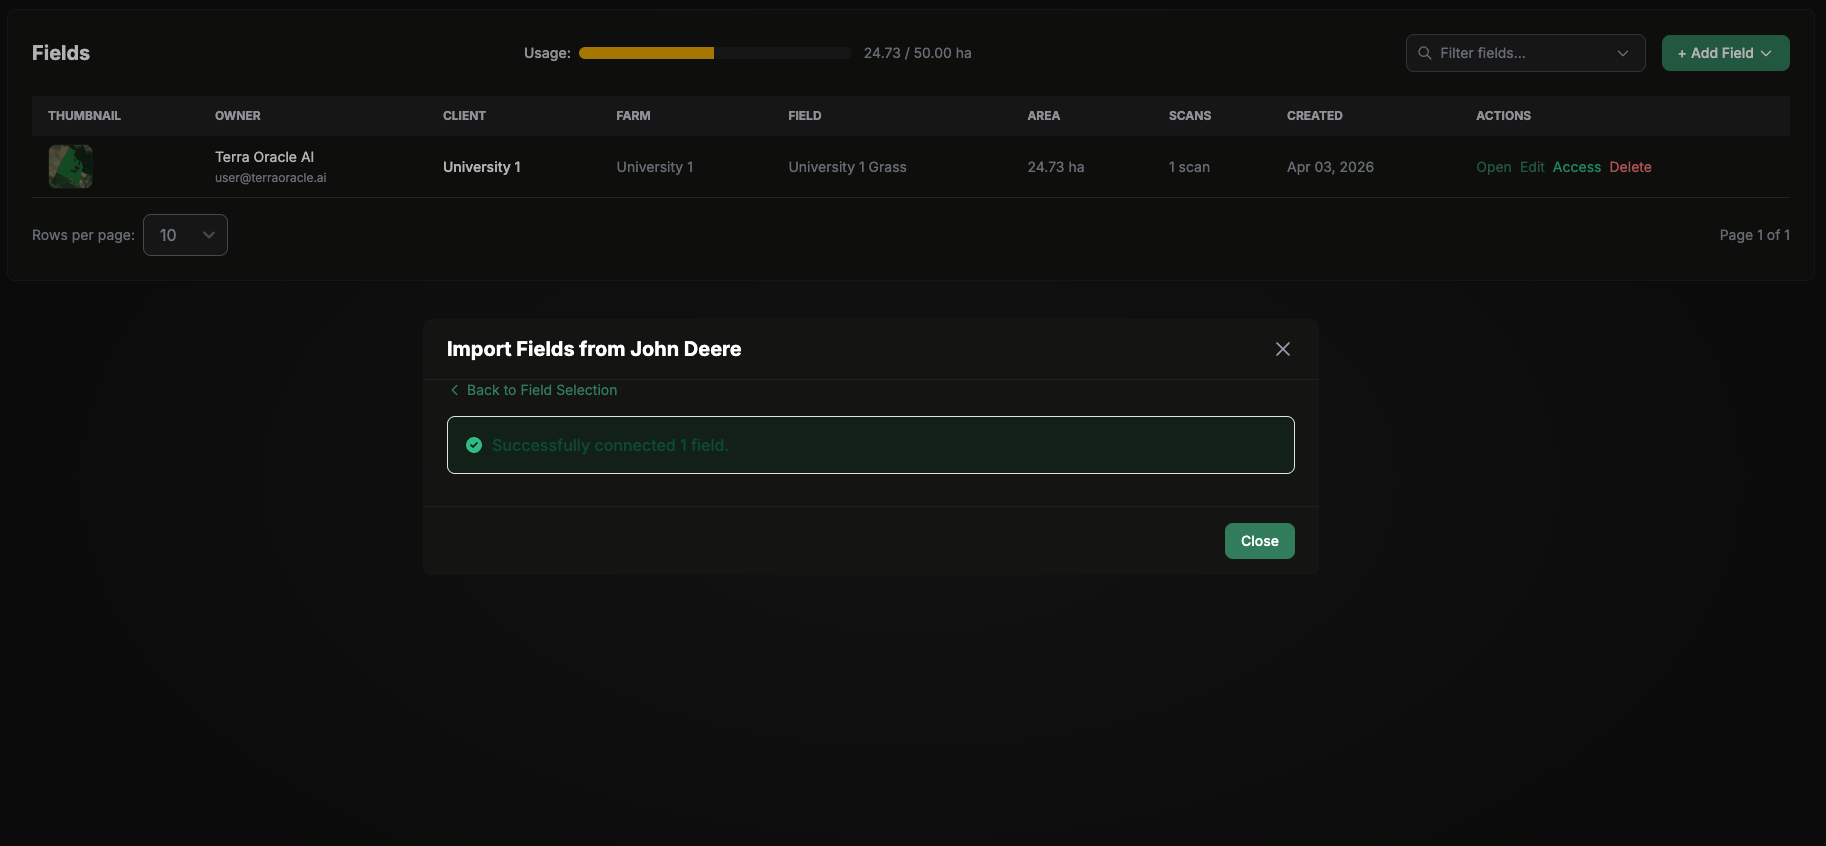
Option 3: Import from John Deere or CNH
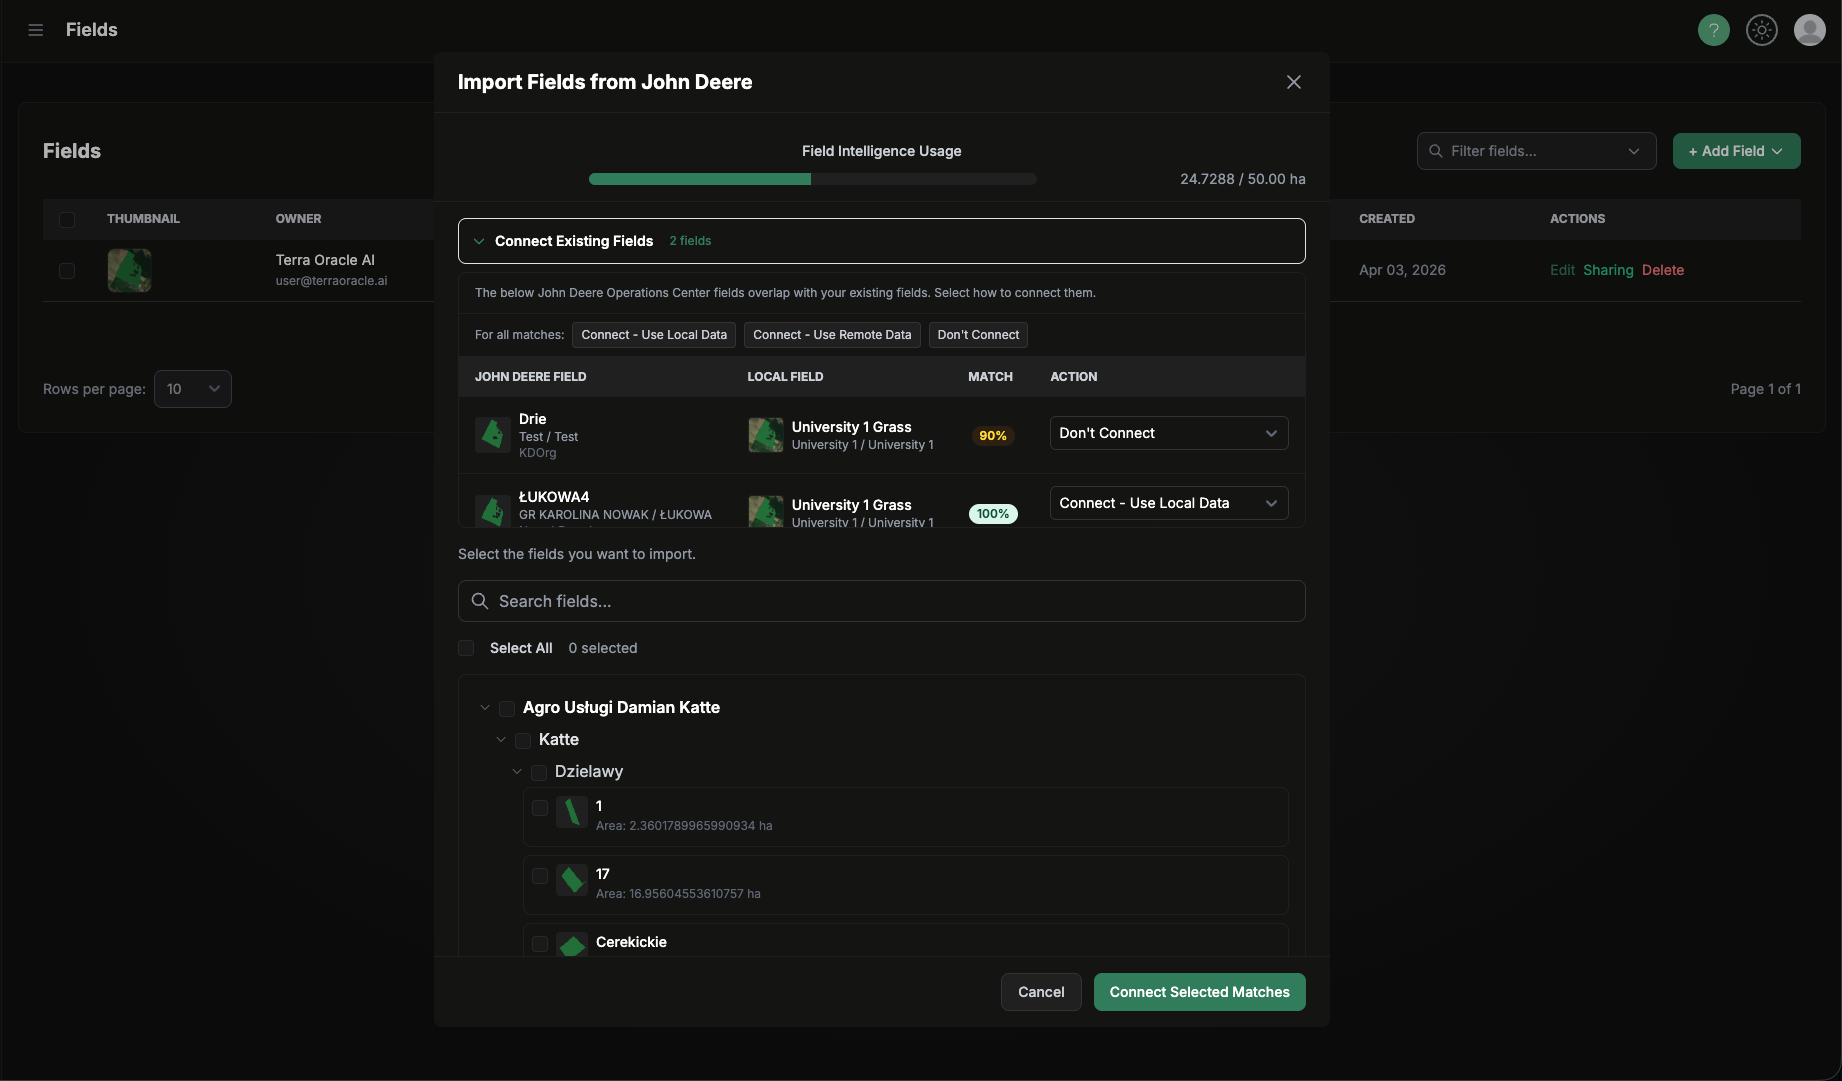

- Connect your platform first in Account Settings > Profile > Third-Party Logins if needed.
- In the field creation flow, choose the relevant import option.
- Select one or more fields from the connected platform.
- Choose whether to create new fields or connect imported fields to existing portal fields.
- Confirm the import.
Edit Existing Fields
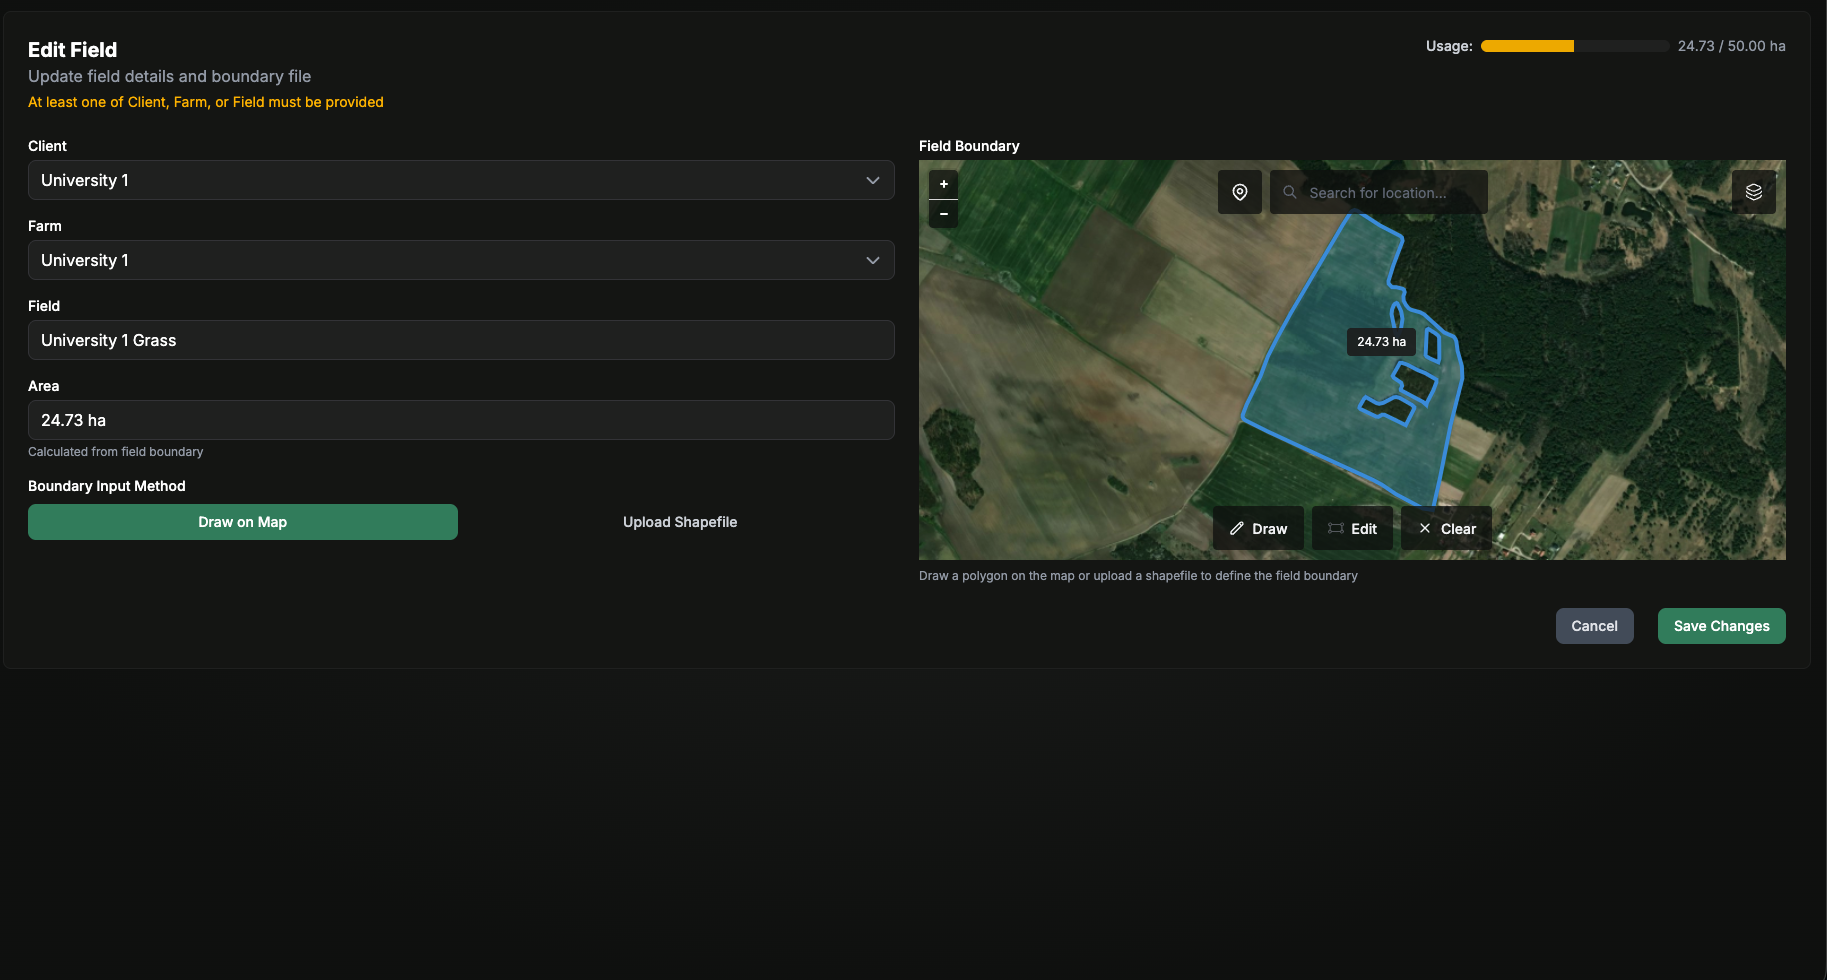
Field editing allows updates to naming and boundary context. Boundary changes can trigger area recalculation and may affect related analysis.
Typical edits include:
- Updating client, farm, or field naming
- Replacing or correcting a boundary
- Reviewing the field’s latest setup before data upload
Manage Field Sharing (Access)
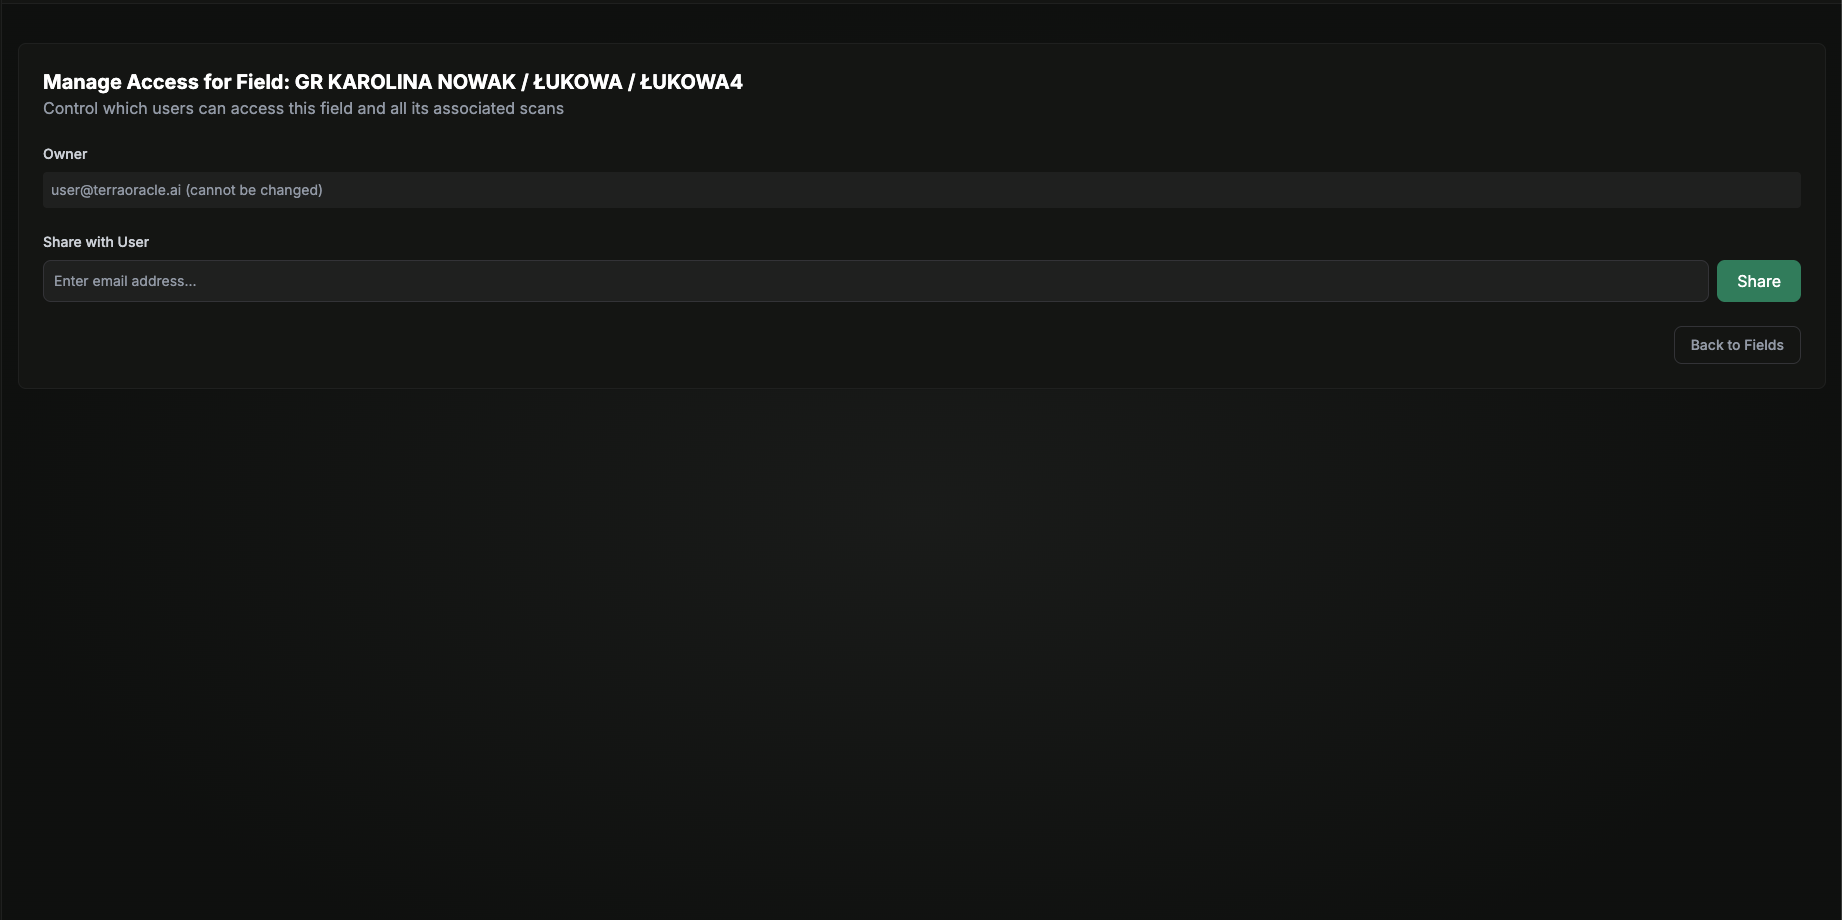
Owners and authorized users can share a field with other users and remove access when needed.
Typical sharing workflow:
- Open the field row or field details.
- Select Manage Access.
- Add a user by email or choose from available users, depending on your role.
- Save the change.
- Review the current access list and remove access when needed.
Use field sharing when:
- A consultant needs access to a specific field
- A teammate should review a field without getting access to everything
- Temporary collaboration is needed for one season or project
Practical Recommendations
- Standardize field naming across your organization.
- Confirm boundaries before running analysis or building VRA plans.
- Review field sharing regularly and remove access that is no longer needed.
Data Uploads and Scans
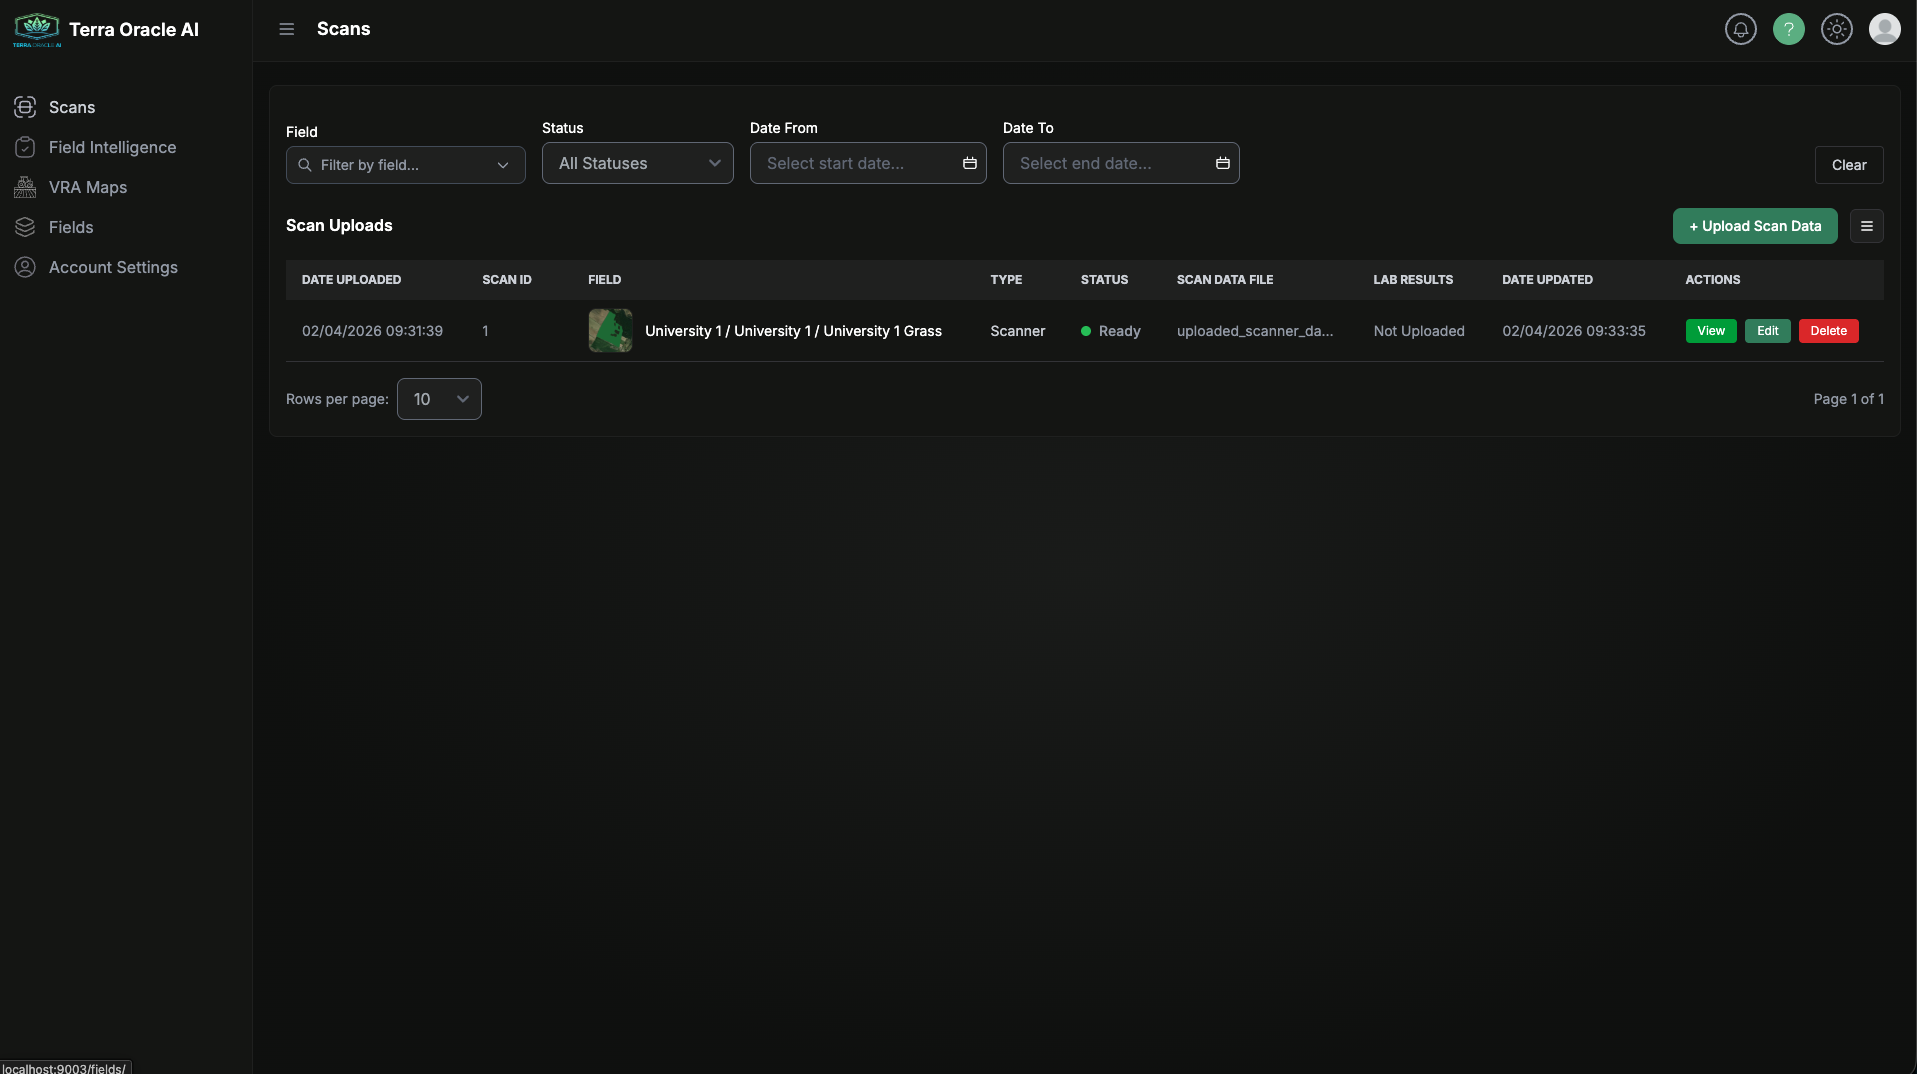
The Scans area is the central place for field data uploads, processing status, and dataset management.
What You Can Do
- Upload new datasets
- Filter and sort uploaded data
- Open ready datasets in Field Intelligence
- Edit scan metadata and supported files
- Delete scans when allowed by your role
Recommended Data Setup Order
For most users, the recommended order is:
- Create or import the field first.
- Confirm the boundary is correct.
- Upload your scanner or external data.
- Wait for processing to complete.
- Open the field in Field Intelligence.
Upload Types
Click Upload Scan Data and choose the upload mode that fits your source data.
Terra Oracle AI Scanner Data
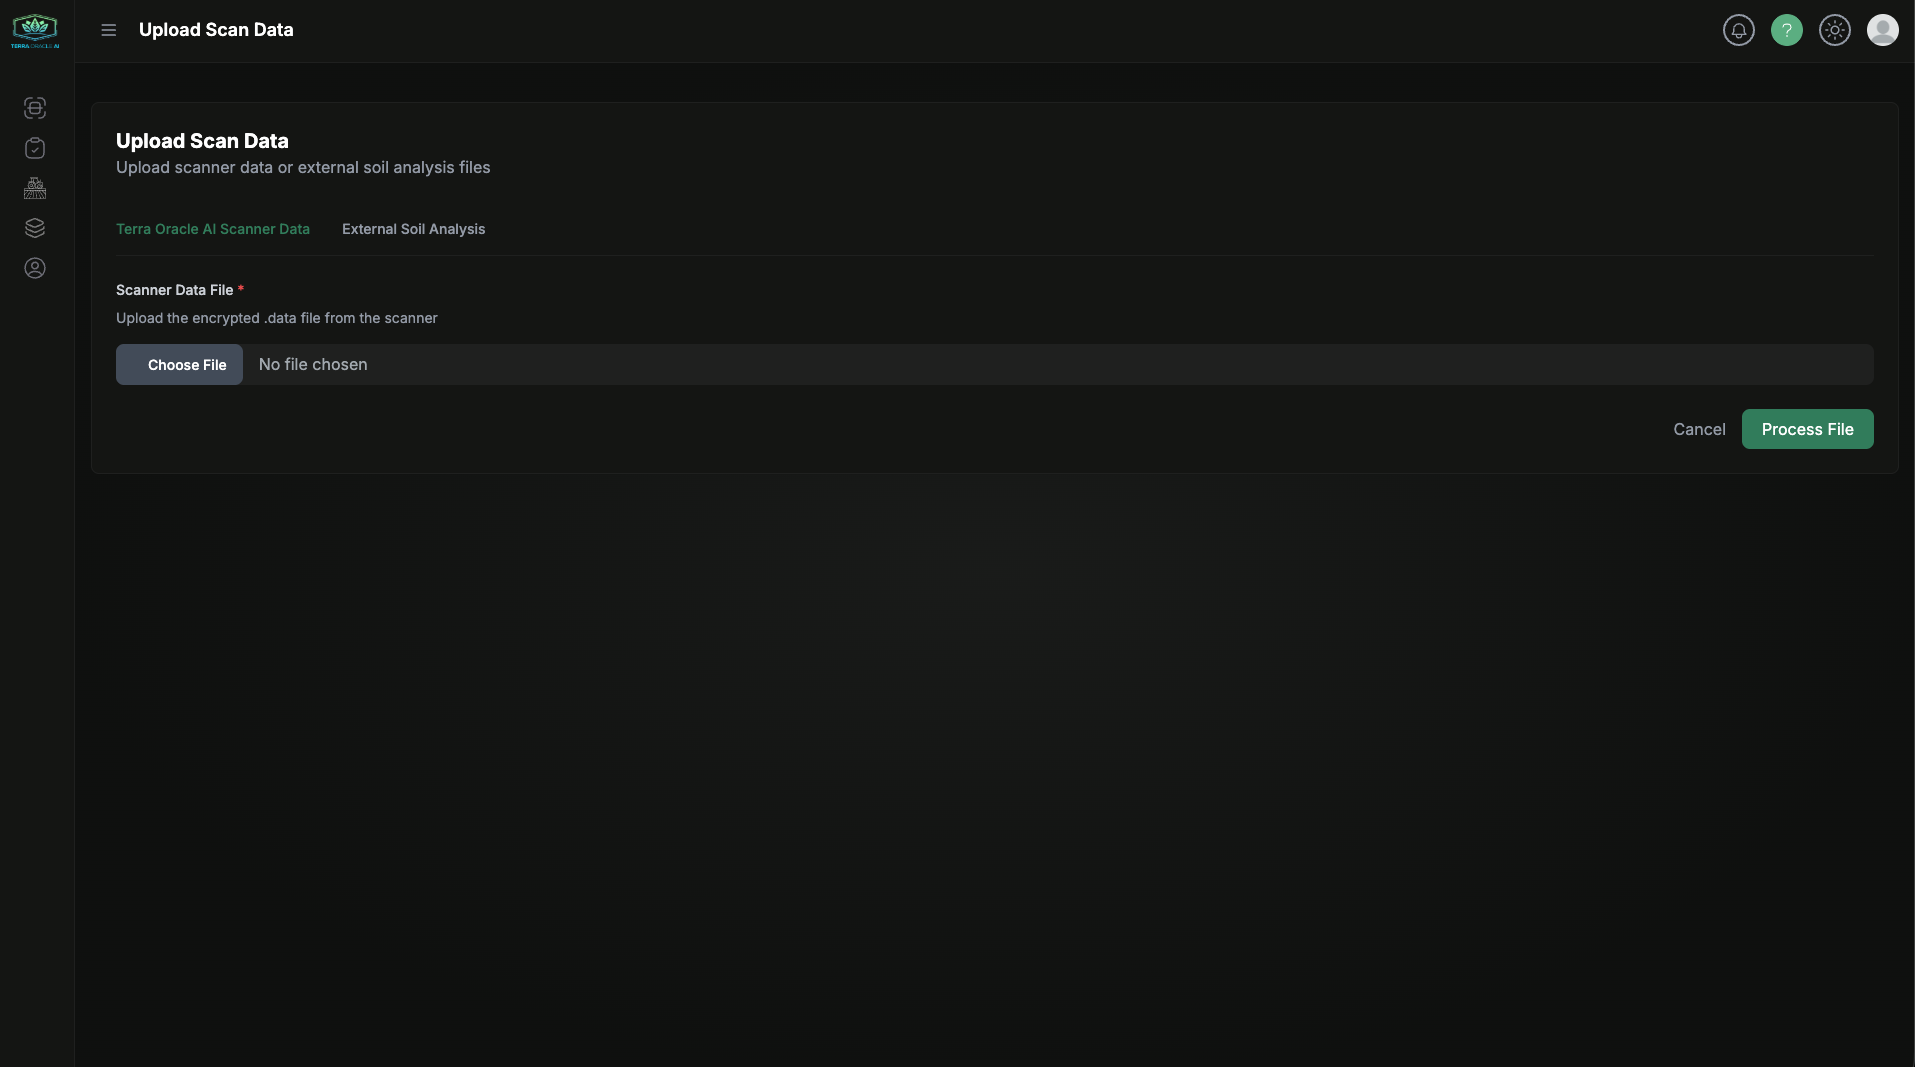
Use this option when you are uploading Terra Oracle AI Scanner output.
- Select the scanner upload mode.
- Upload the
.datafile. - Continue through the metadata extraction flow.
- Confirm the field assignment.
- Finalize the upload.
External Soil Analysis or Other Supported Field Data
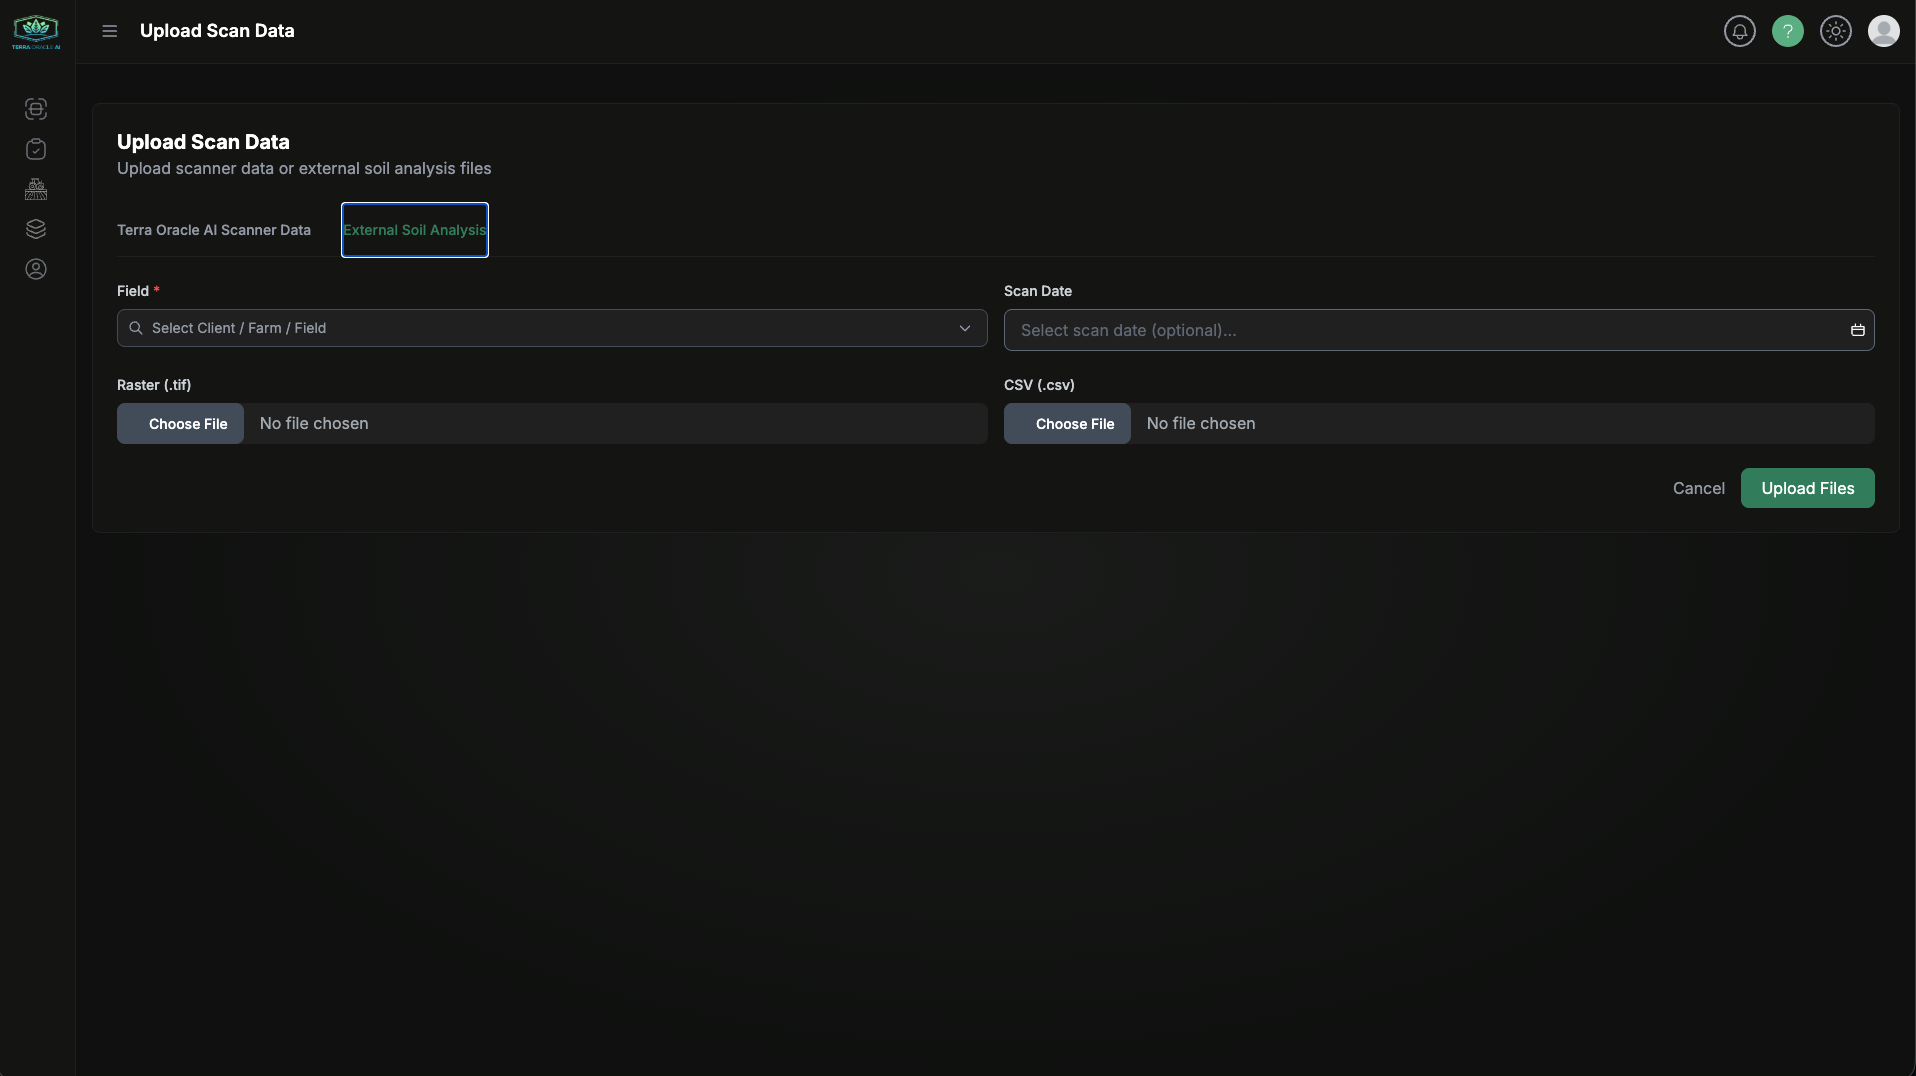
Use this option when you are uploading external agronomic data tied to a field.
- Select the external upload mode.
- Choose the field.
- Set the scan or sample date if available.
- Upload the required file or files.
- Submit and return to the scans list to monitor progress.
Typical file types include:
- Raster files such as
.tifor.tiff - CSV files such as
.csv - Lab results or supporting external files where supported by the workflow
Status and Readiness
Uploaded data moves through processing stages before becoming ready for use.
The main scan statuses are:
- Uploaded: The data has been submitted and is waiting for or entering processing.
- Processing: The portal is processing the uploaded data.
- Ready: The data is available for use in analysis workflows.
The View action becomes available once the field and data are ready for analysis.
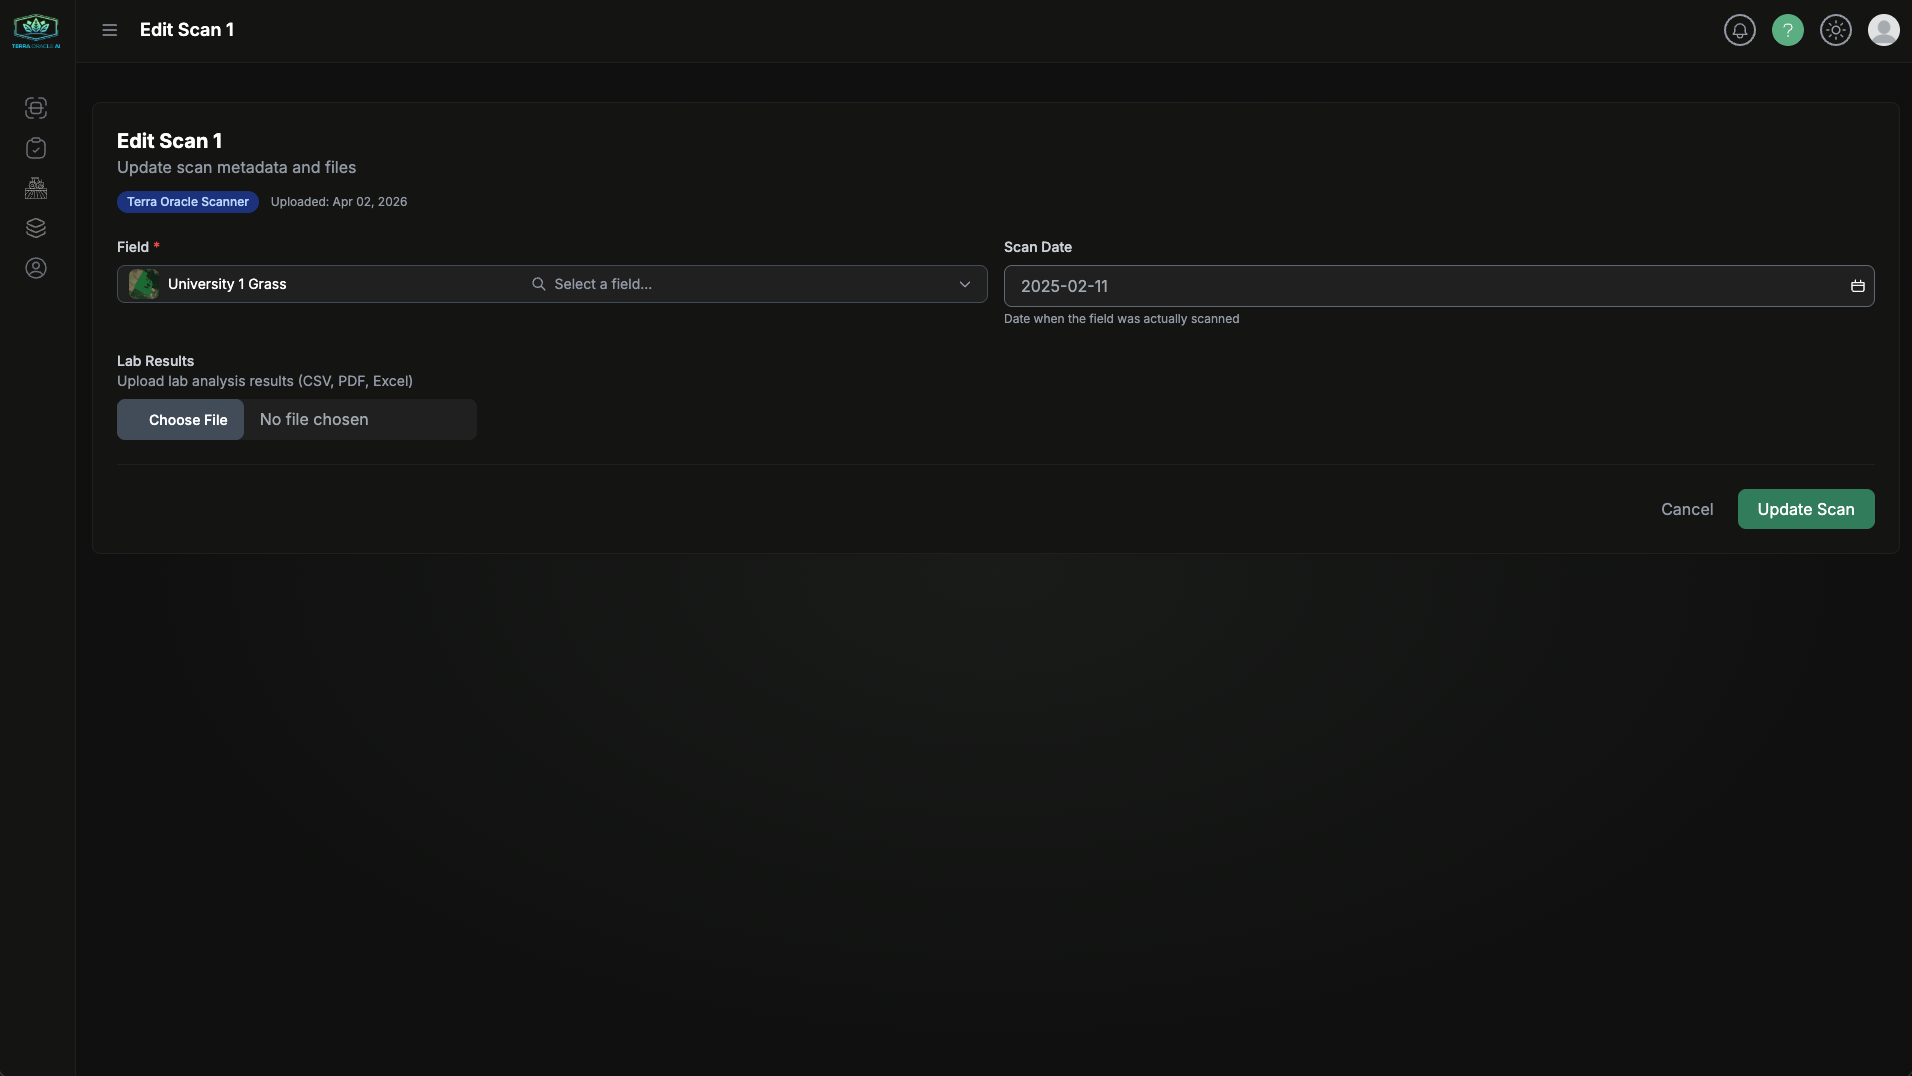
Edit Existing Scans
Use Edit from the scan row to update supported fields or files.
Good Upload Practices
- Use clear file names such as
farm-field-date. - Keep a local archive of source files.
- Upload lab and raster data from similar time periods whenever possible.
- Double-check field assignment before starting analysis.
Field Intelligence
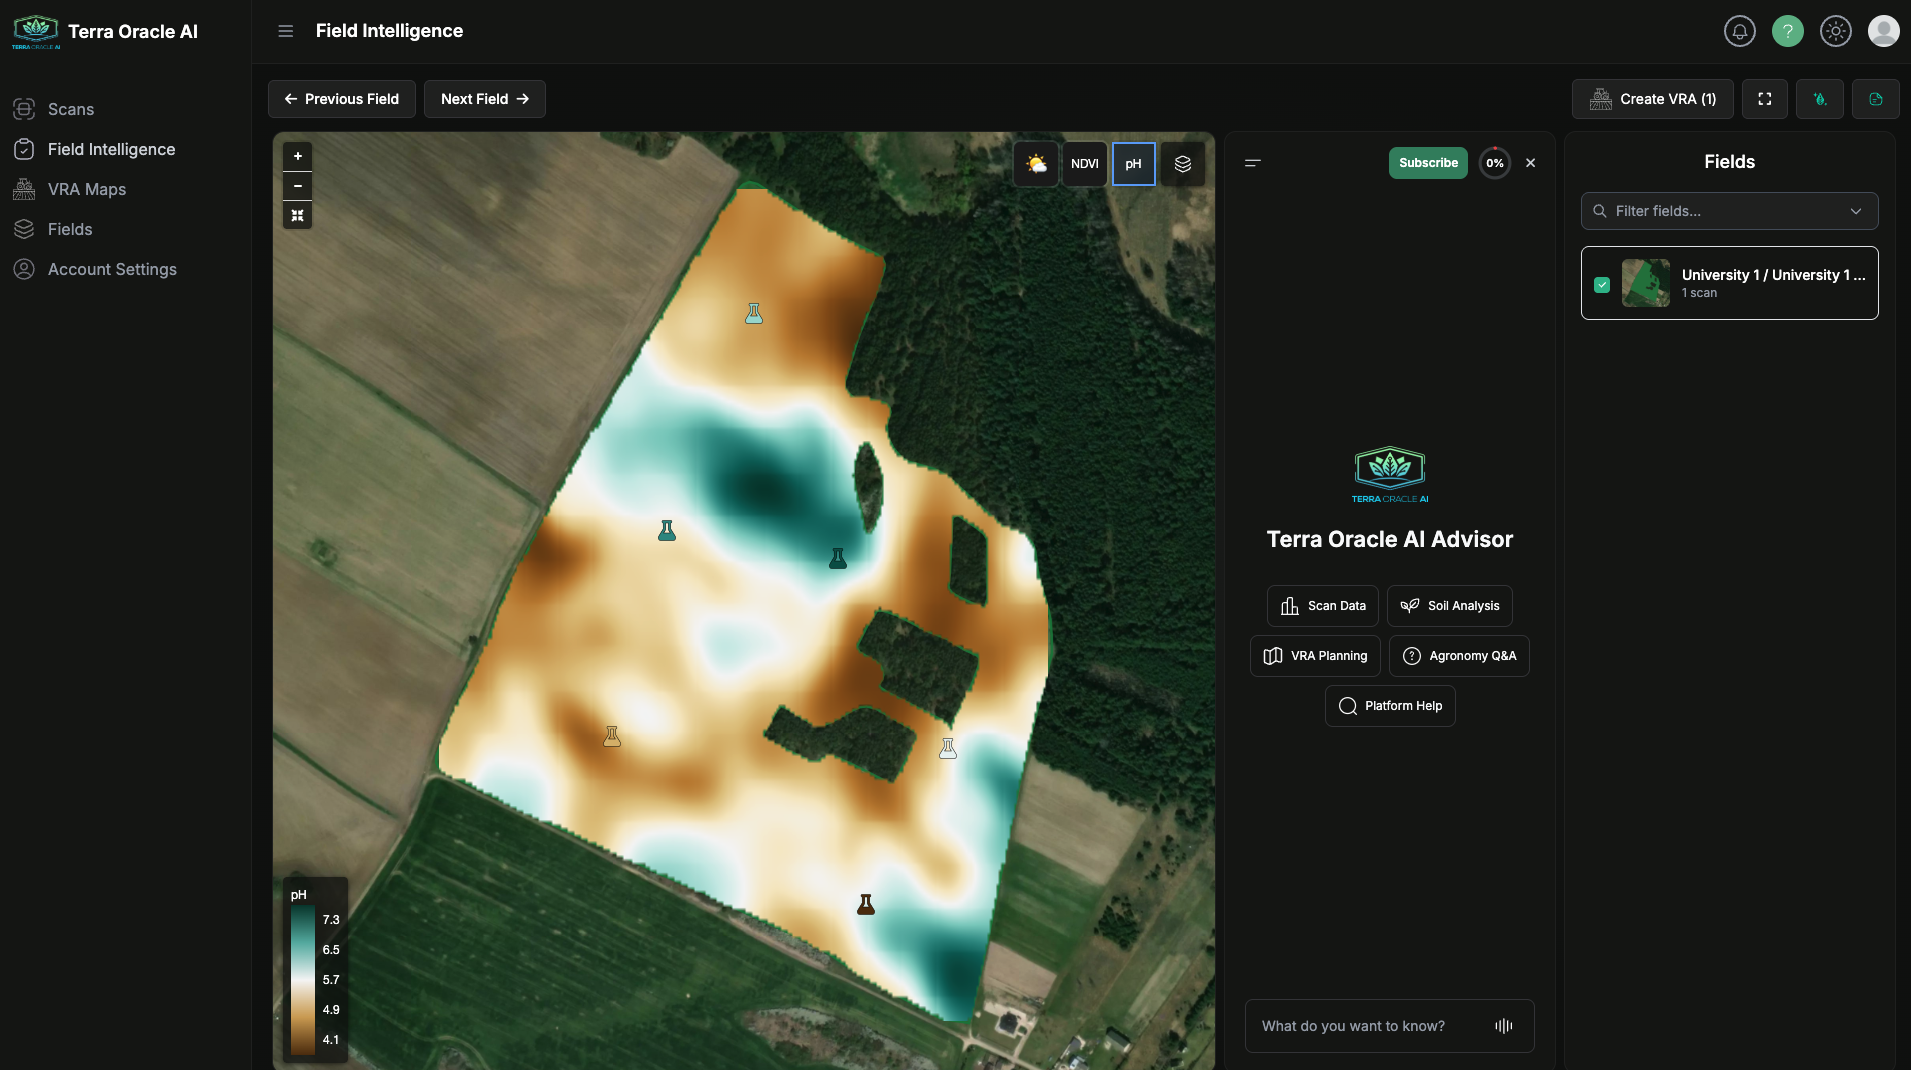
Field Intelligence is the main workspace for reviewing field data and interpreting patterns across layers.
How to Enter
You can open Field Intelligence from:
- The left sidebar
- A View action on a ready scan
- A field workflow that opens directly into analysis
What You Can Do
- Review fields and related Field Intelligence
- Switch between available Field Intelligence layers
- Compare multiple maps across different layers
- Use AI Advisor to analyze, interpret, and suggest field operations
- Create single-field or multi-field VRA plans
Field Intelligence Controls
- AI Advisor show/hide
- Fields browser show/hide
- Create VRA
- Fullscreen mode
- Edit Layout in the user menu
Field Intelligence Layers
The exact layers available depend on the data present for the selected field.
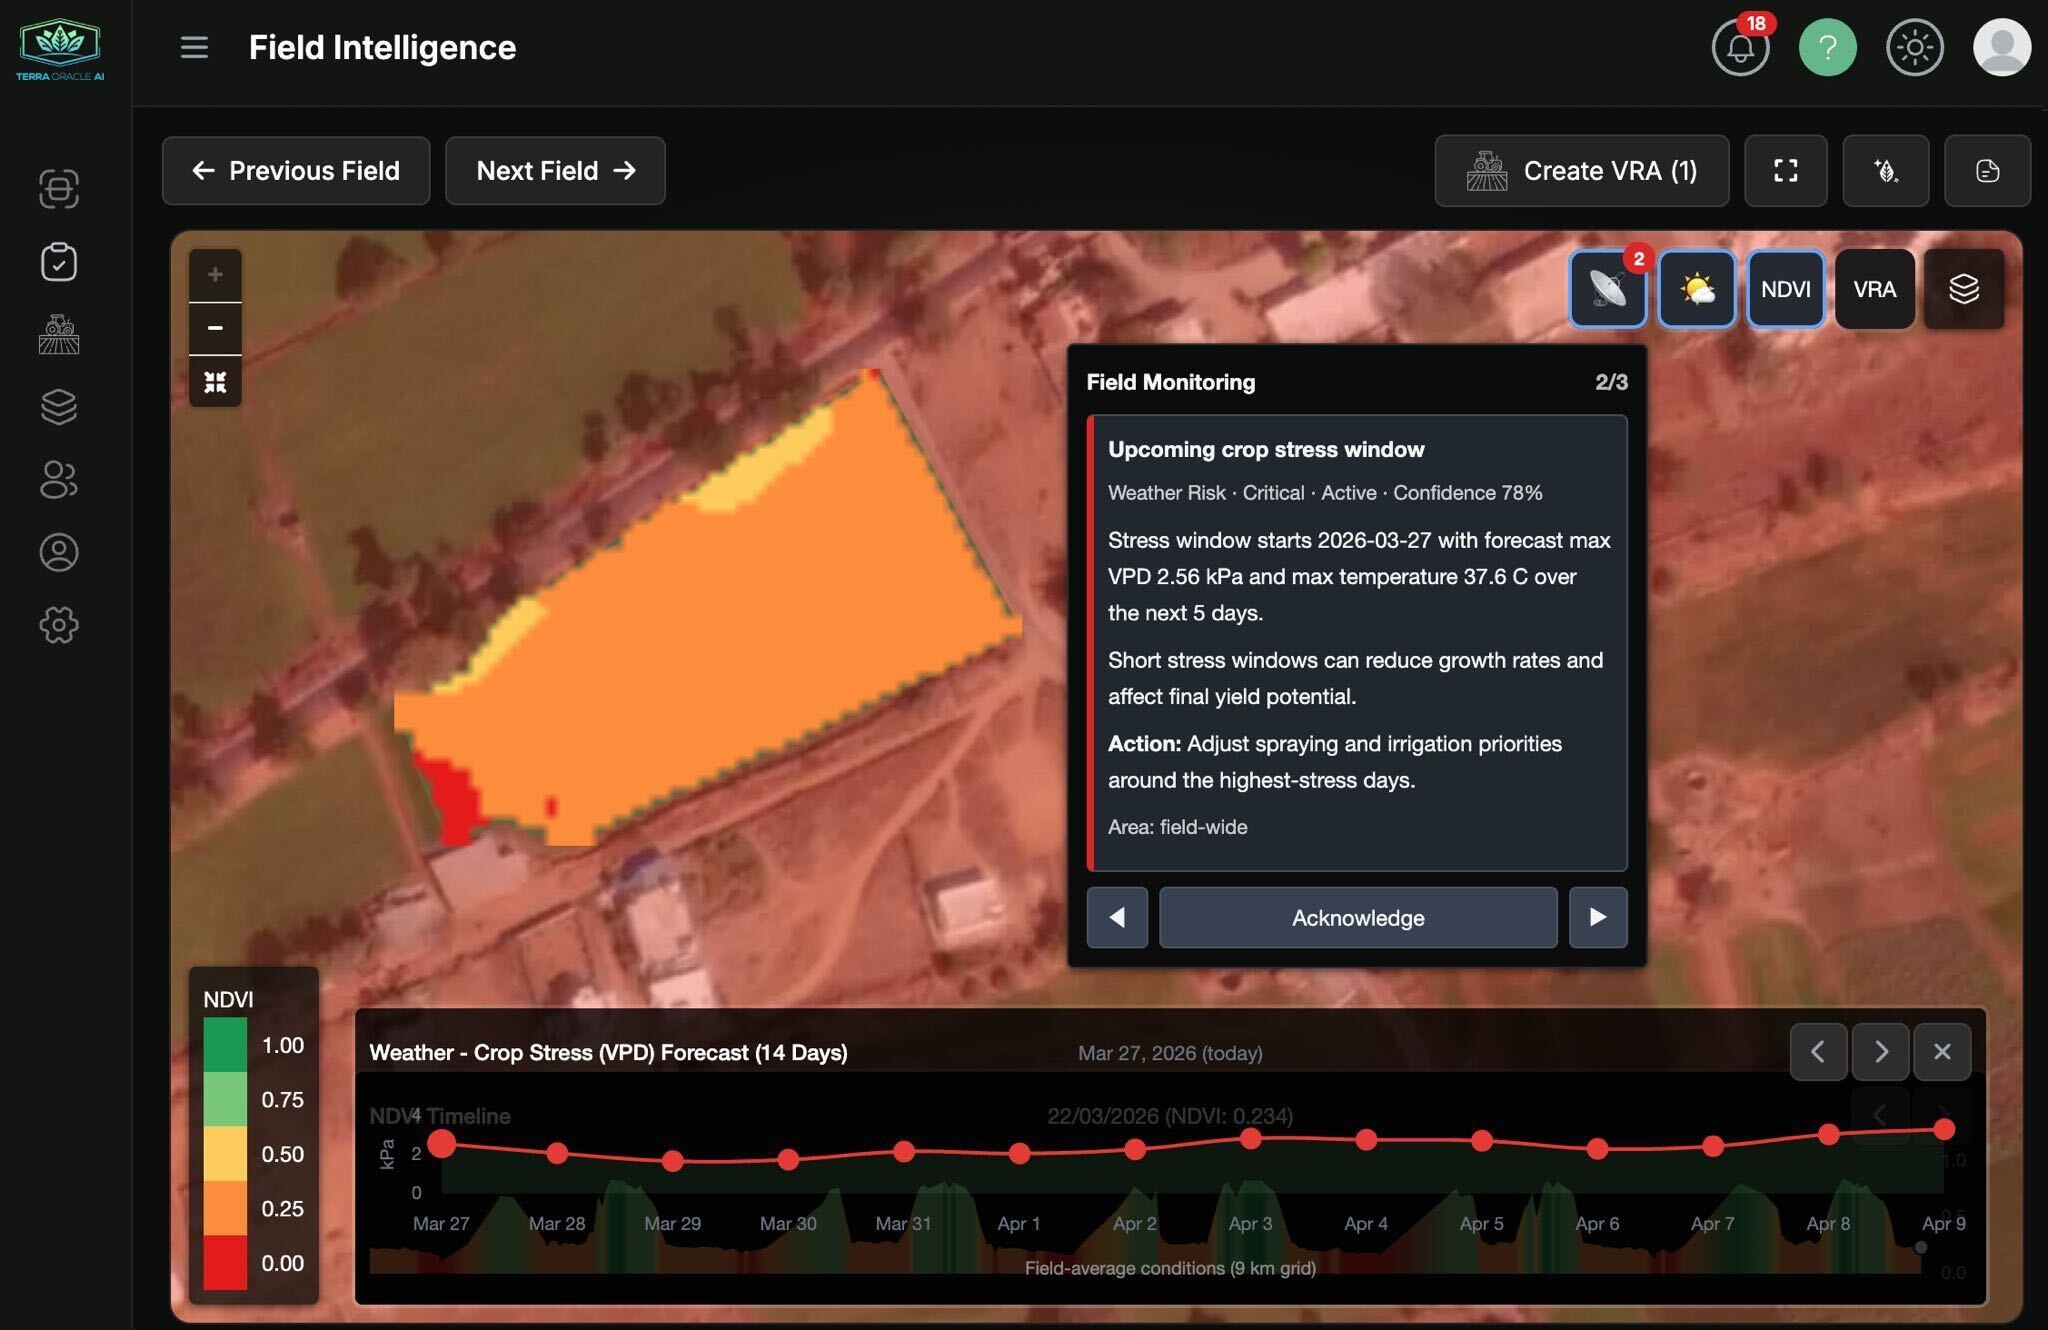
Weather
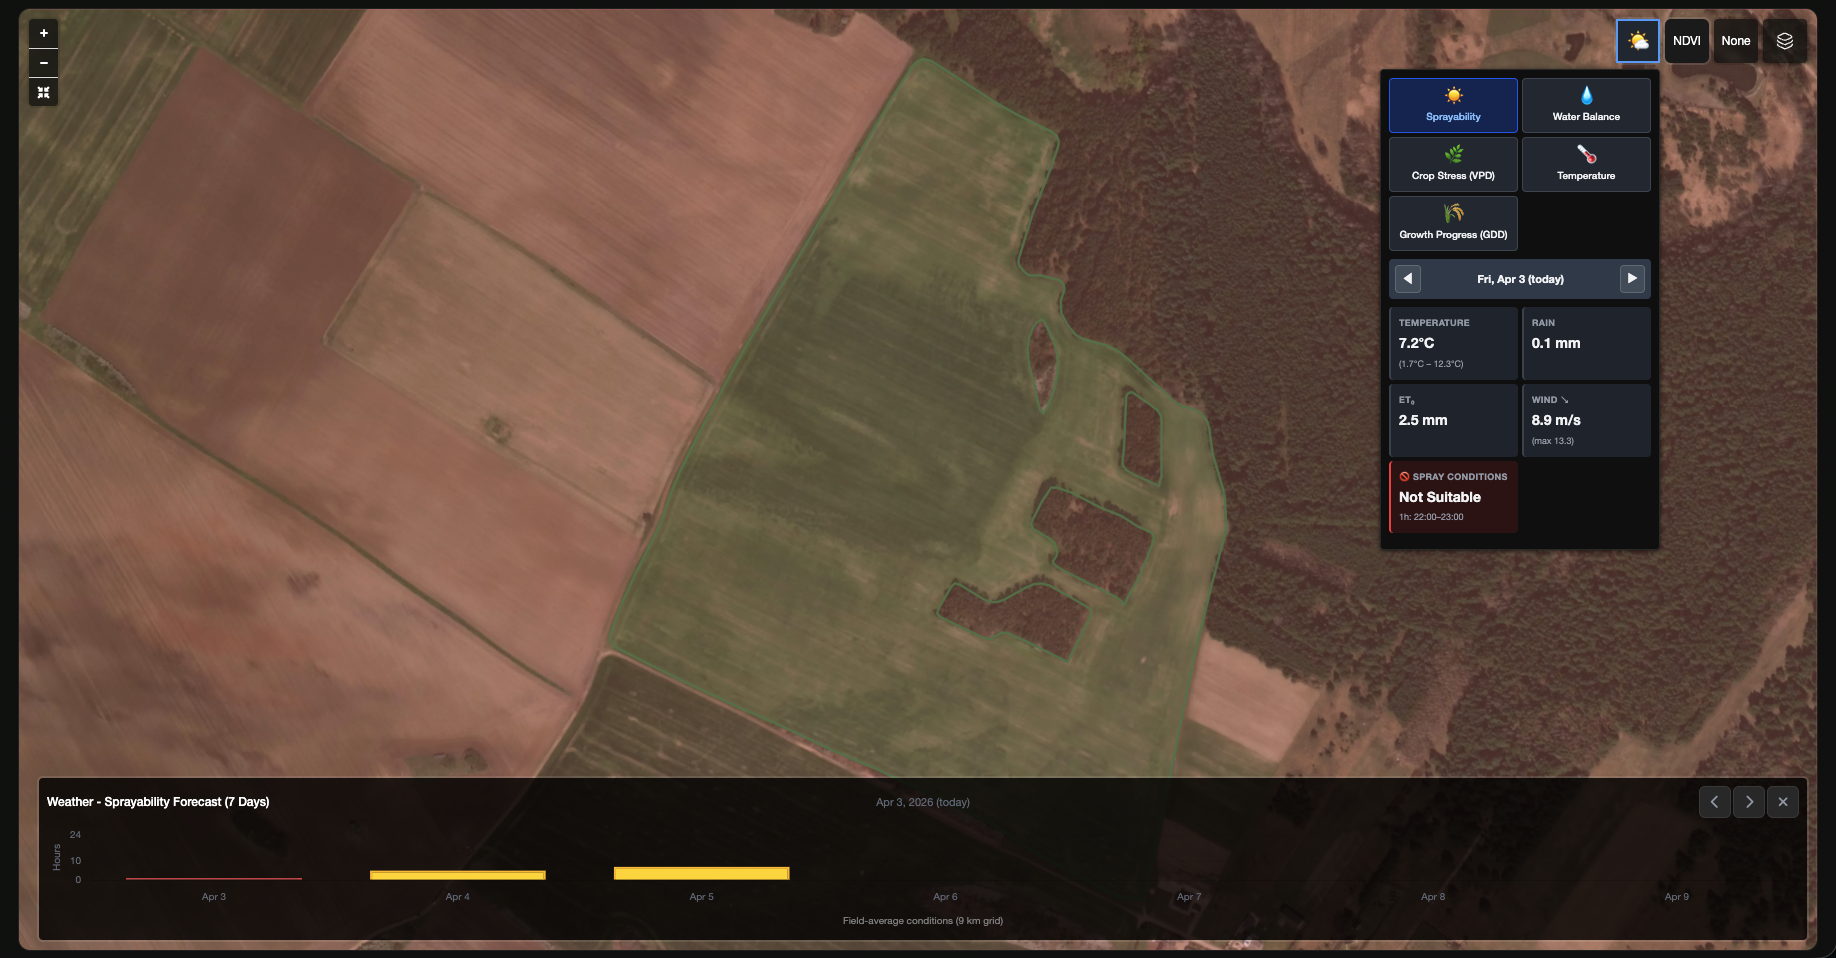
Use weather layers to review field-level weather history and forecast context for planning and interpretation.
Typical uses:
- Checking rain, temperature, or agronomic weather context
- Comparing field performance with recent weather conditions
- Reviewing conditions that may affect field access or application timing
NDVI
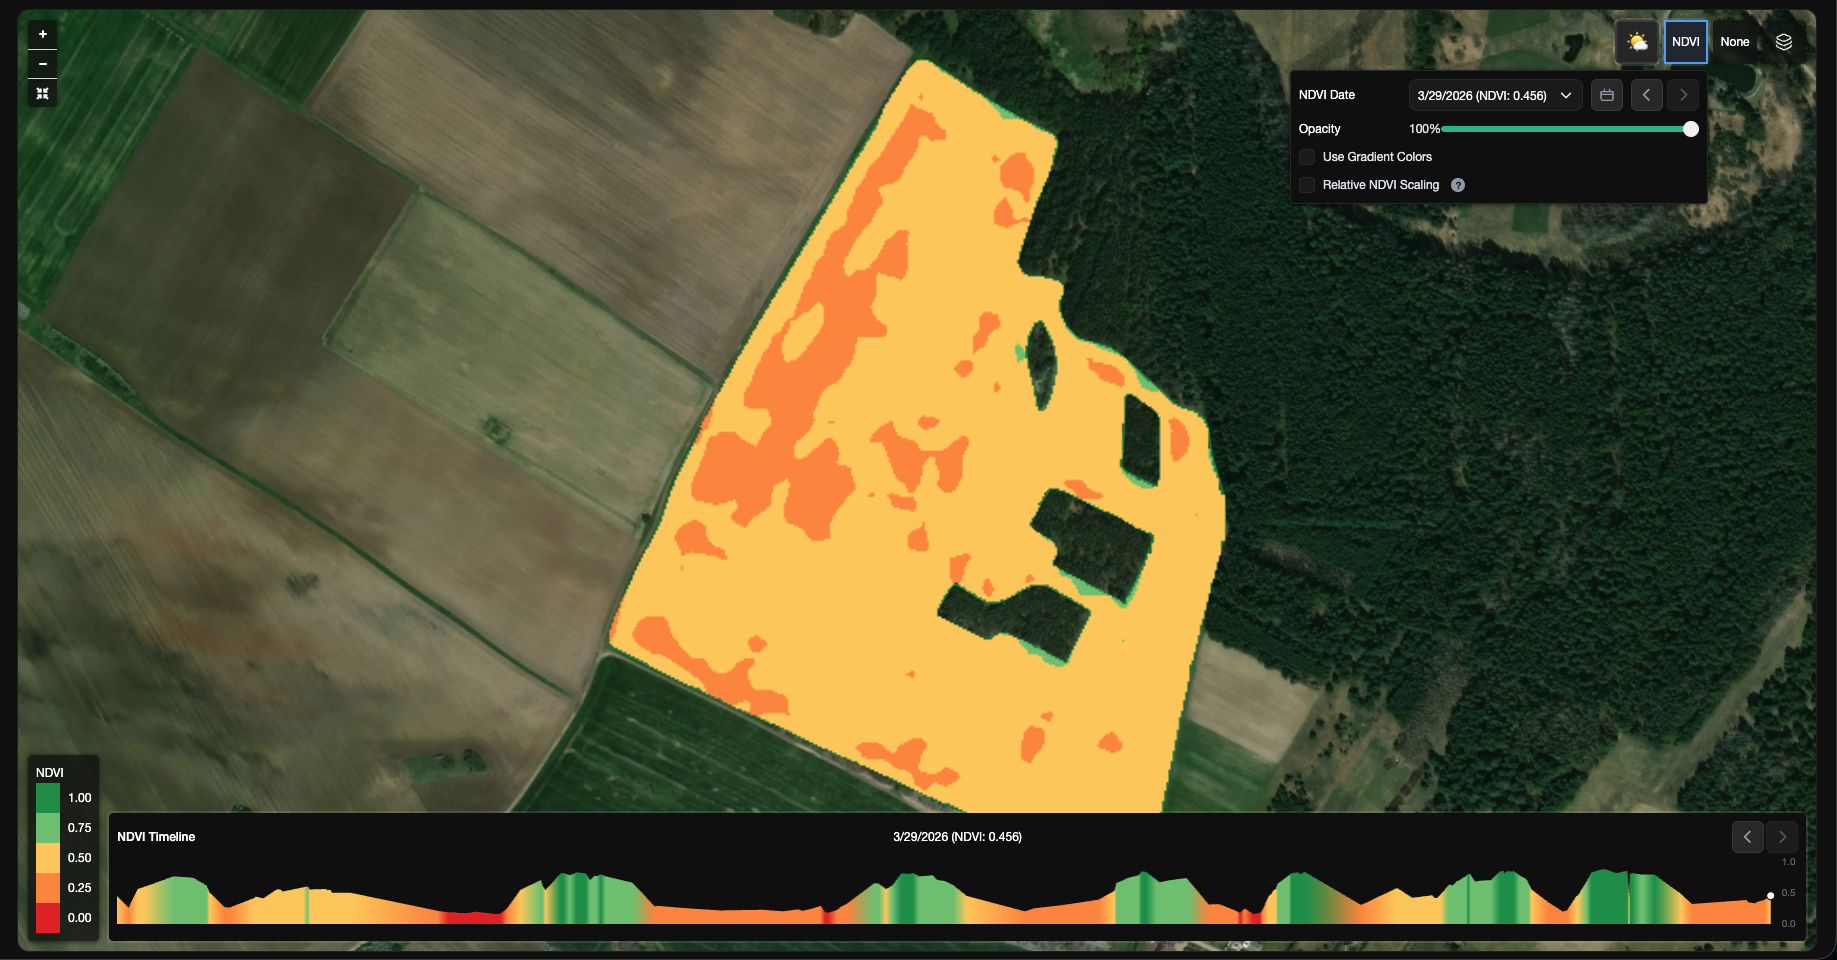
Use NDVI layers to review recent and historical vegetation vigor, as well as temporal changes across the field.
Typical uses:
- Comparing crop development across zones
- Identifying weak or inconsistent areas
- Comparing NDVI patterns with soil or lab layers
VRA

Use VRA layers to review generated zone structure and application logic before export.
Typical uses:
- Reviewing management zones before operations
- Comparing zone logic against soil, weather, and NDVI context
- Validating planned application rates before export
Soil and Lab
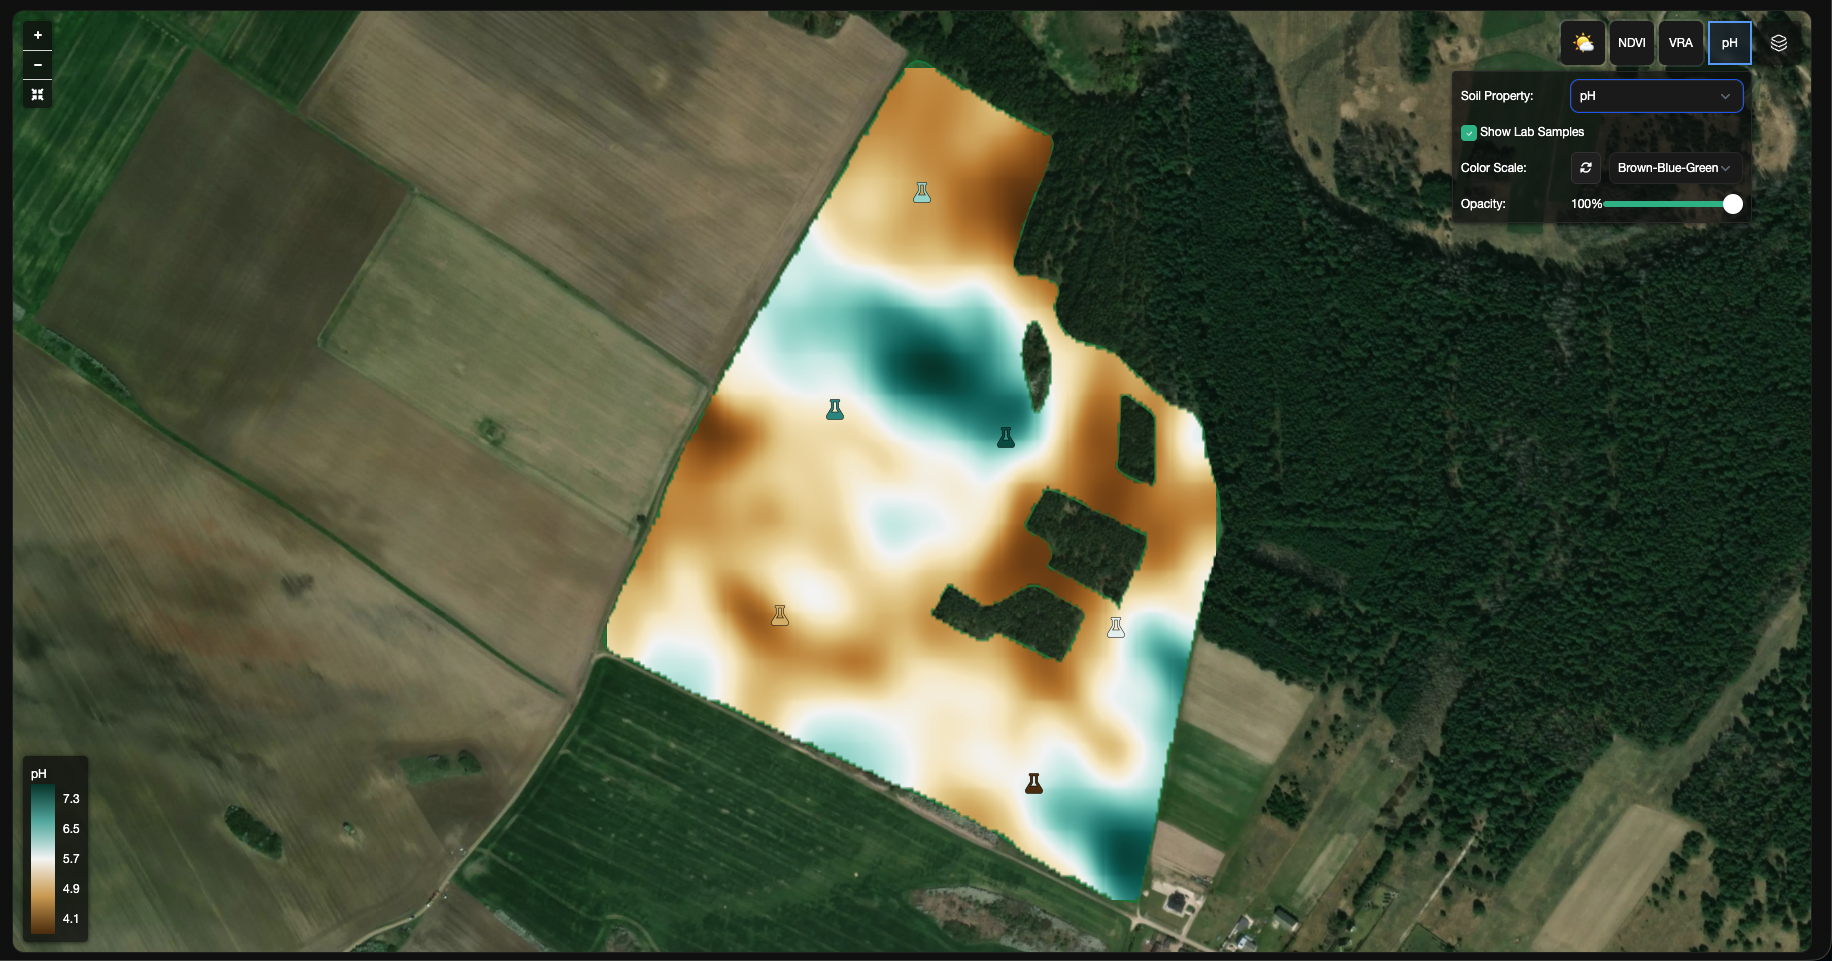
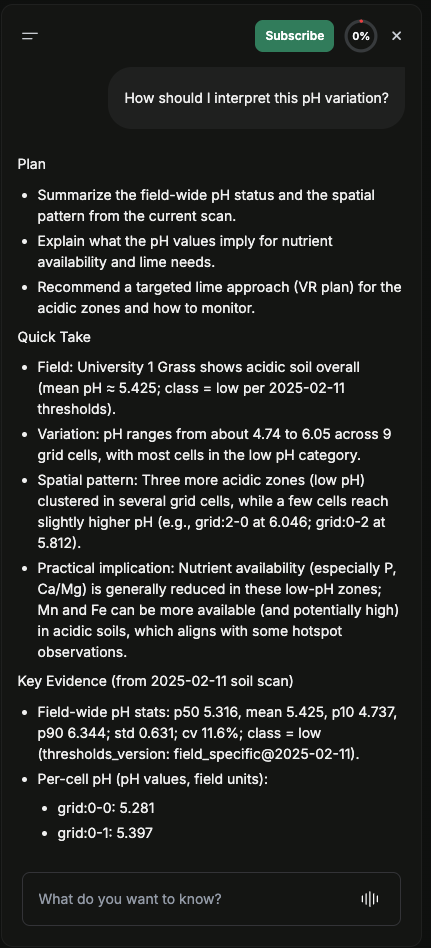
Use soil and lab layers to review nutrient variability, pH, organic matter, and supporting sample-based context.
Typical uses:
- Comparing raster patterns with lab-backed points
- Identifying zones that may need different agronomic treatment
- Understanding how soil variation relates to crop performance
Map Display
Use map display controls to switch base map layers and add or remove maps for comparison.
Best Practices for Layer Review
- Confirm you are in the correct field and scan context.
- Start with one main layer, then add comparison views.
- Use side-by-side comparisons when checking correlations.
- Review boundaries and field geometry before drawing conclusions.
- Use AI Advisor when you want help interpreting what you see.
Notes on Availability
- Some layers appear only when relevant data exists.
- Field Intelligence is available within the free hectare allowance, and additional covered hectares require a Field Intelligence subscription.
- Visible controls can vary by role and by enabled services.
VRA Maps (Prescription Files)
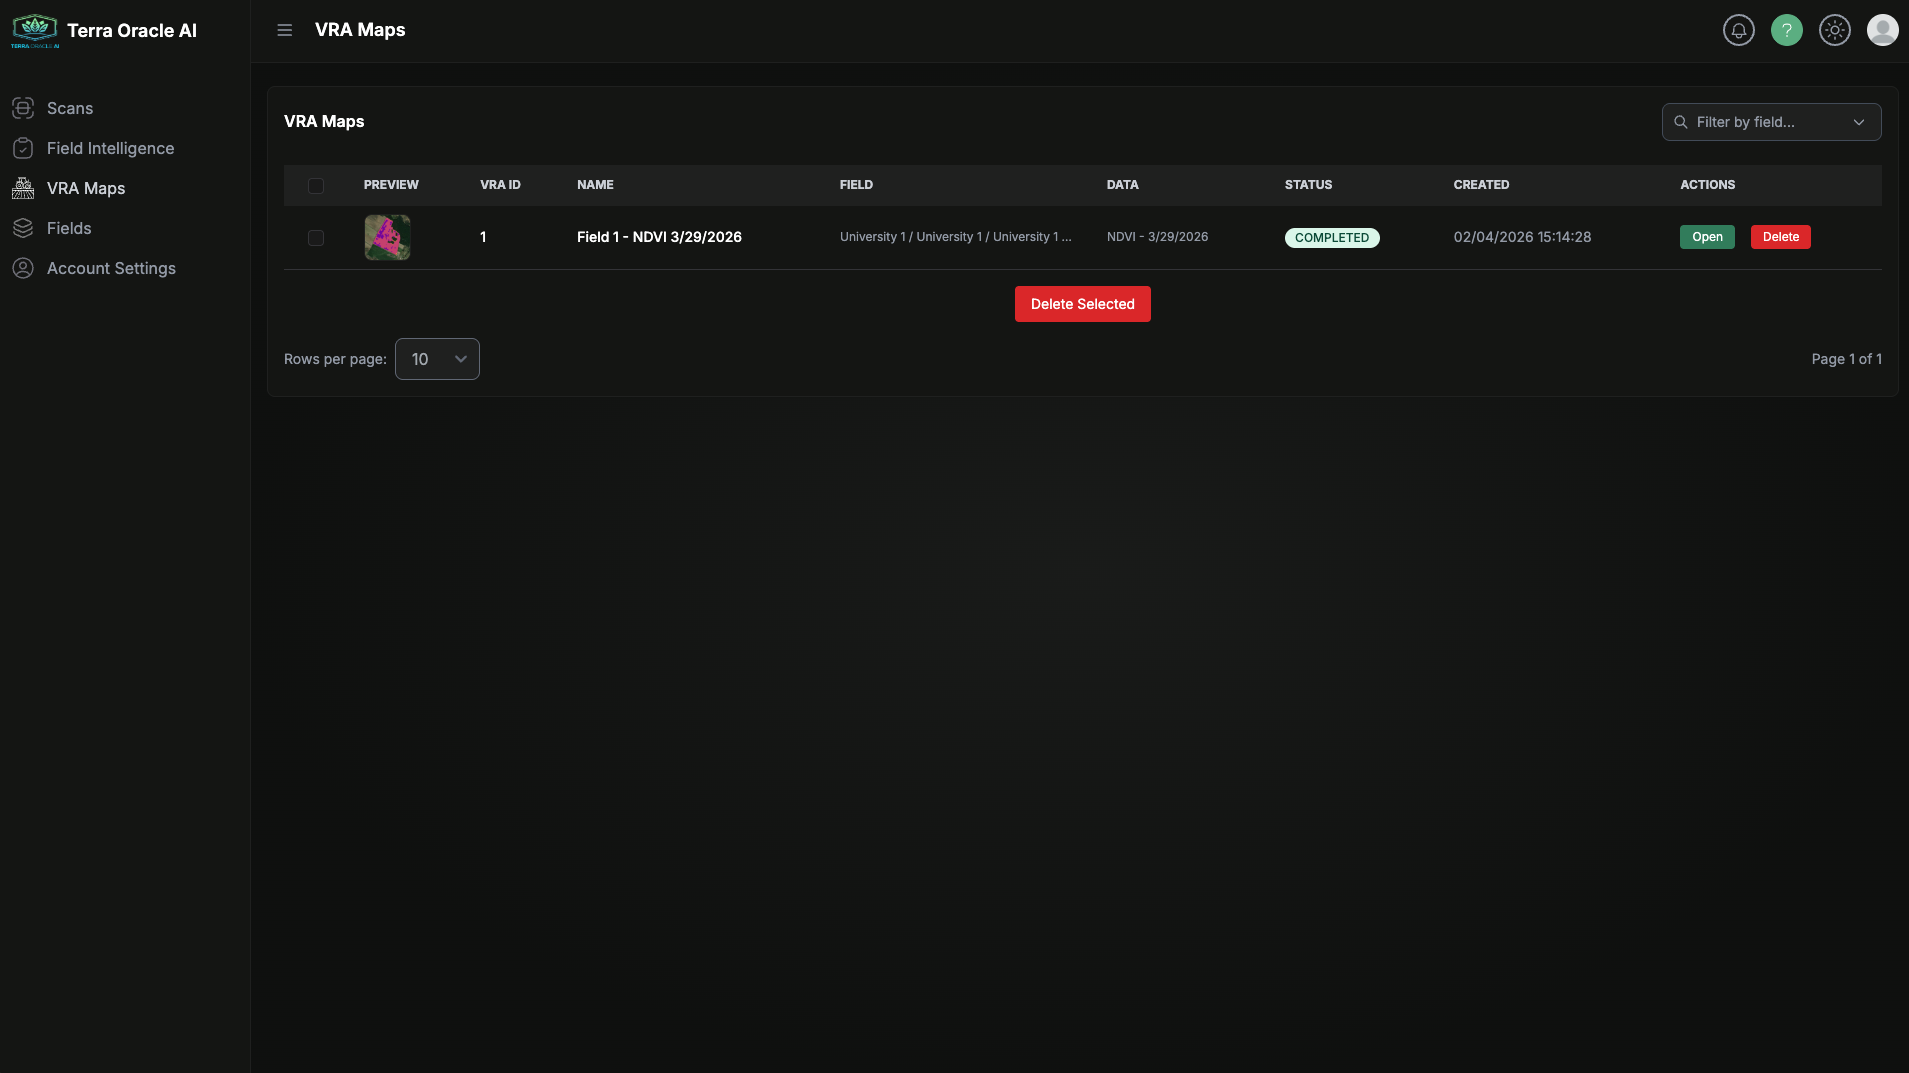
Use VRA Maps to configure zones, tune application rates, and export prescription outputs.
Typical Workflow
- Start from Create VRA in Field Intelligence or open an existing plan from VRA Maps.
- Select the source data context.
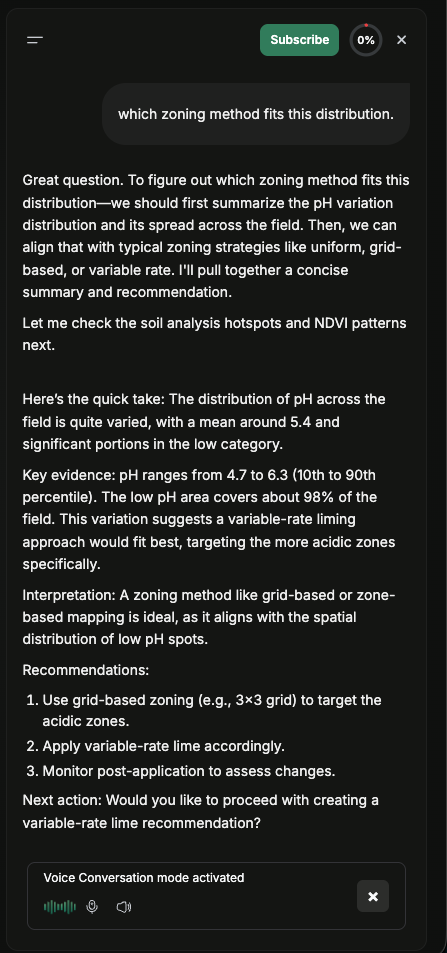
- Choose the zoning method.
- Adjust thresholds and application rates.
- Save the plan.
- Export the output.
Main Actions
- Save VRA
- Export VRA
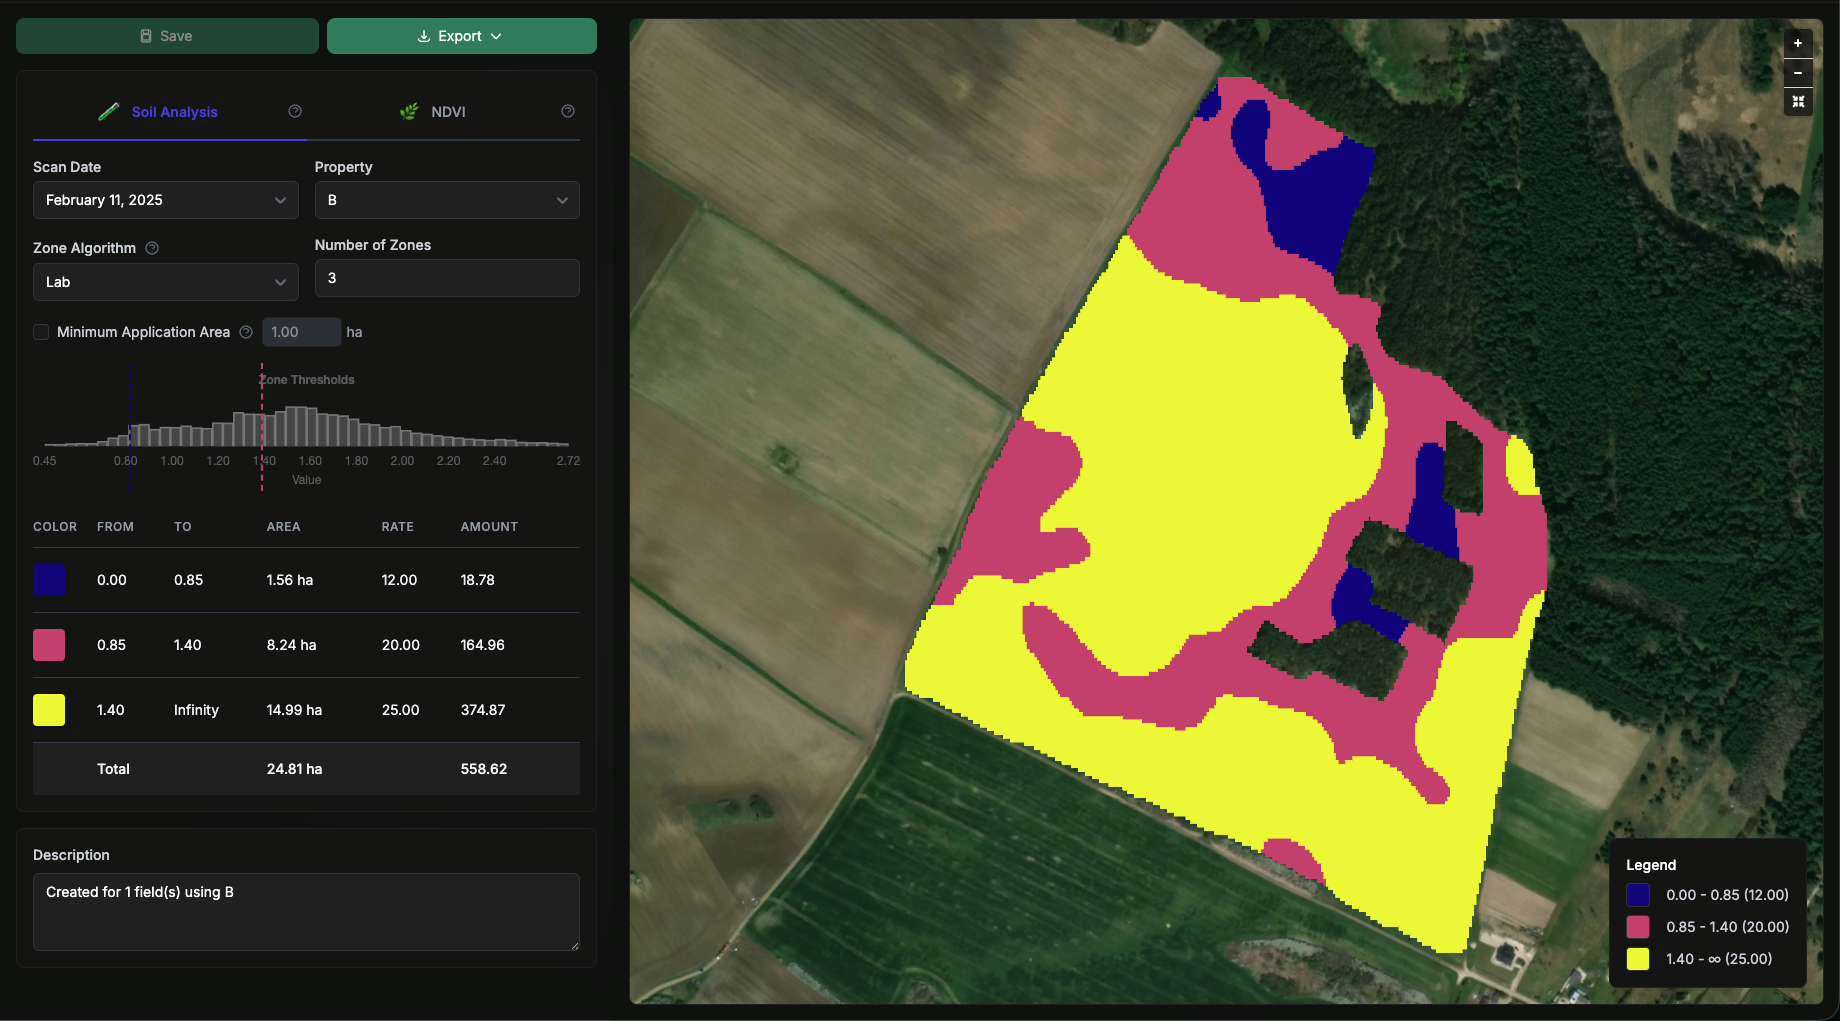
Supported Zoning Methods
- Lab
- Equal Interval
- Equal Area
- Standard Deviation
- Manual
Advanced Controls
- Smart Zone Boundaries
- Minimum Application Area
- Zone Histogram
- Zones Table
These controls help you move from raw variability to a more practical operational plan.
Export Options
Export downloads a ZIP file that contains the VRA output files.
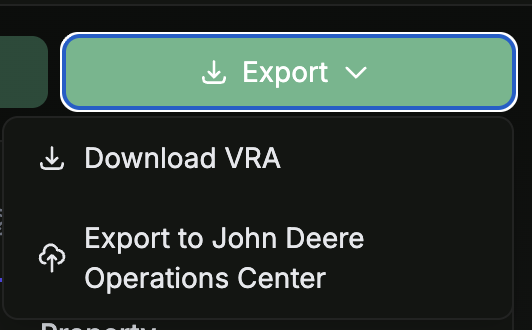
The export workflow can also send outputs to connected platforms where that export option is available.
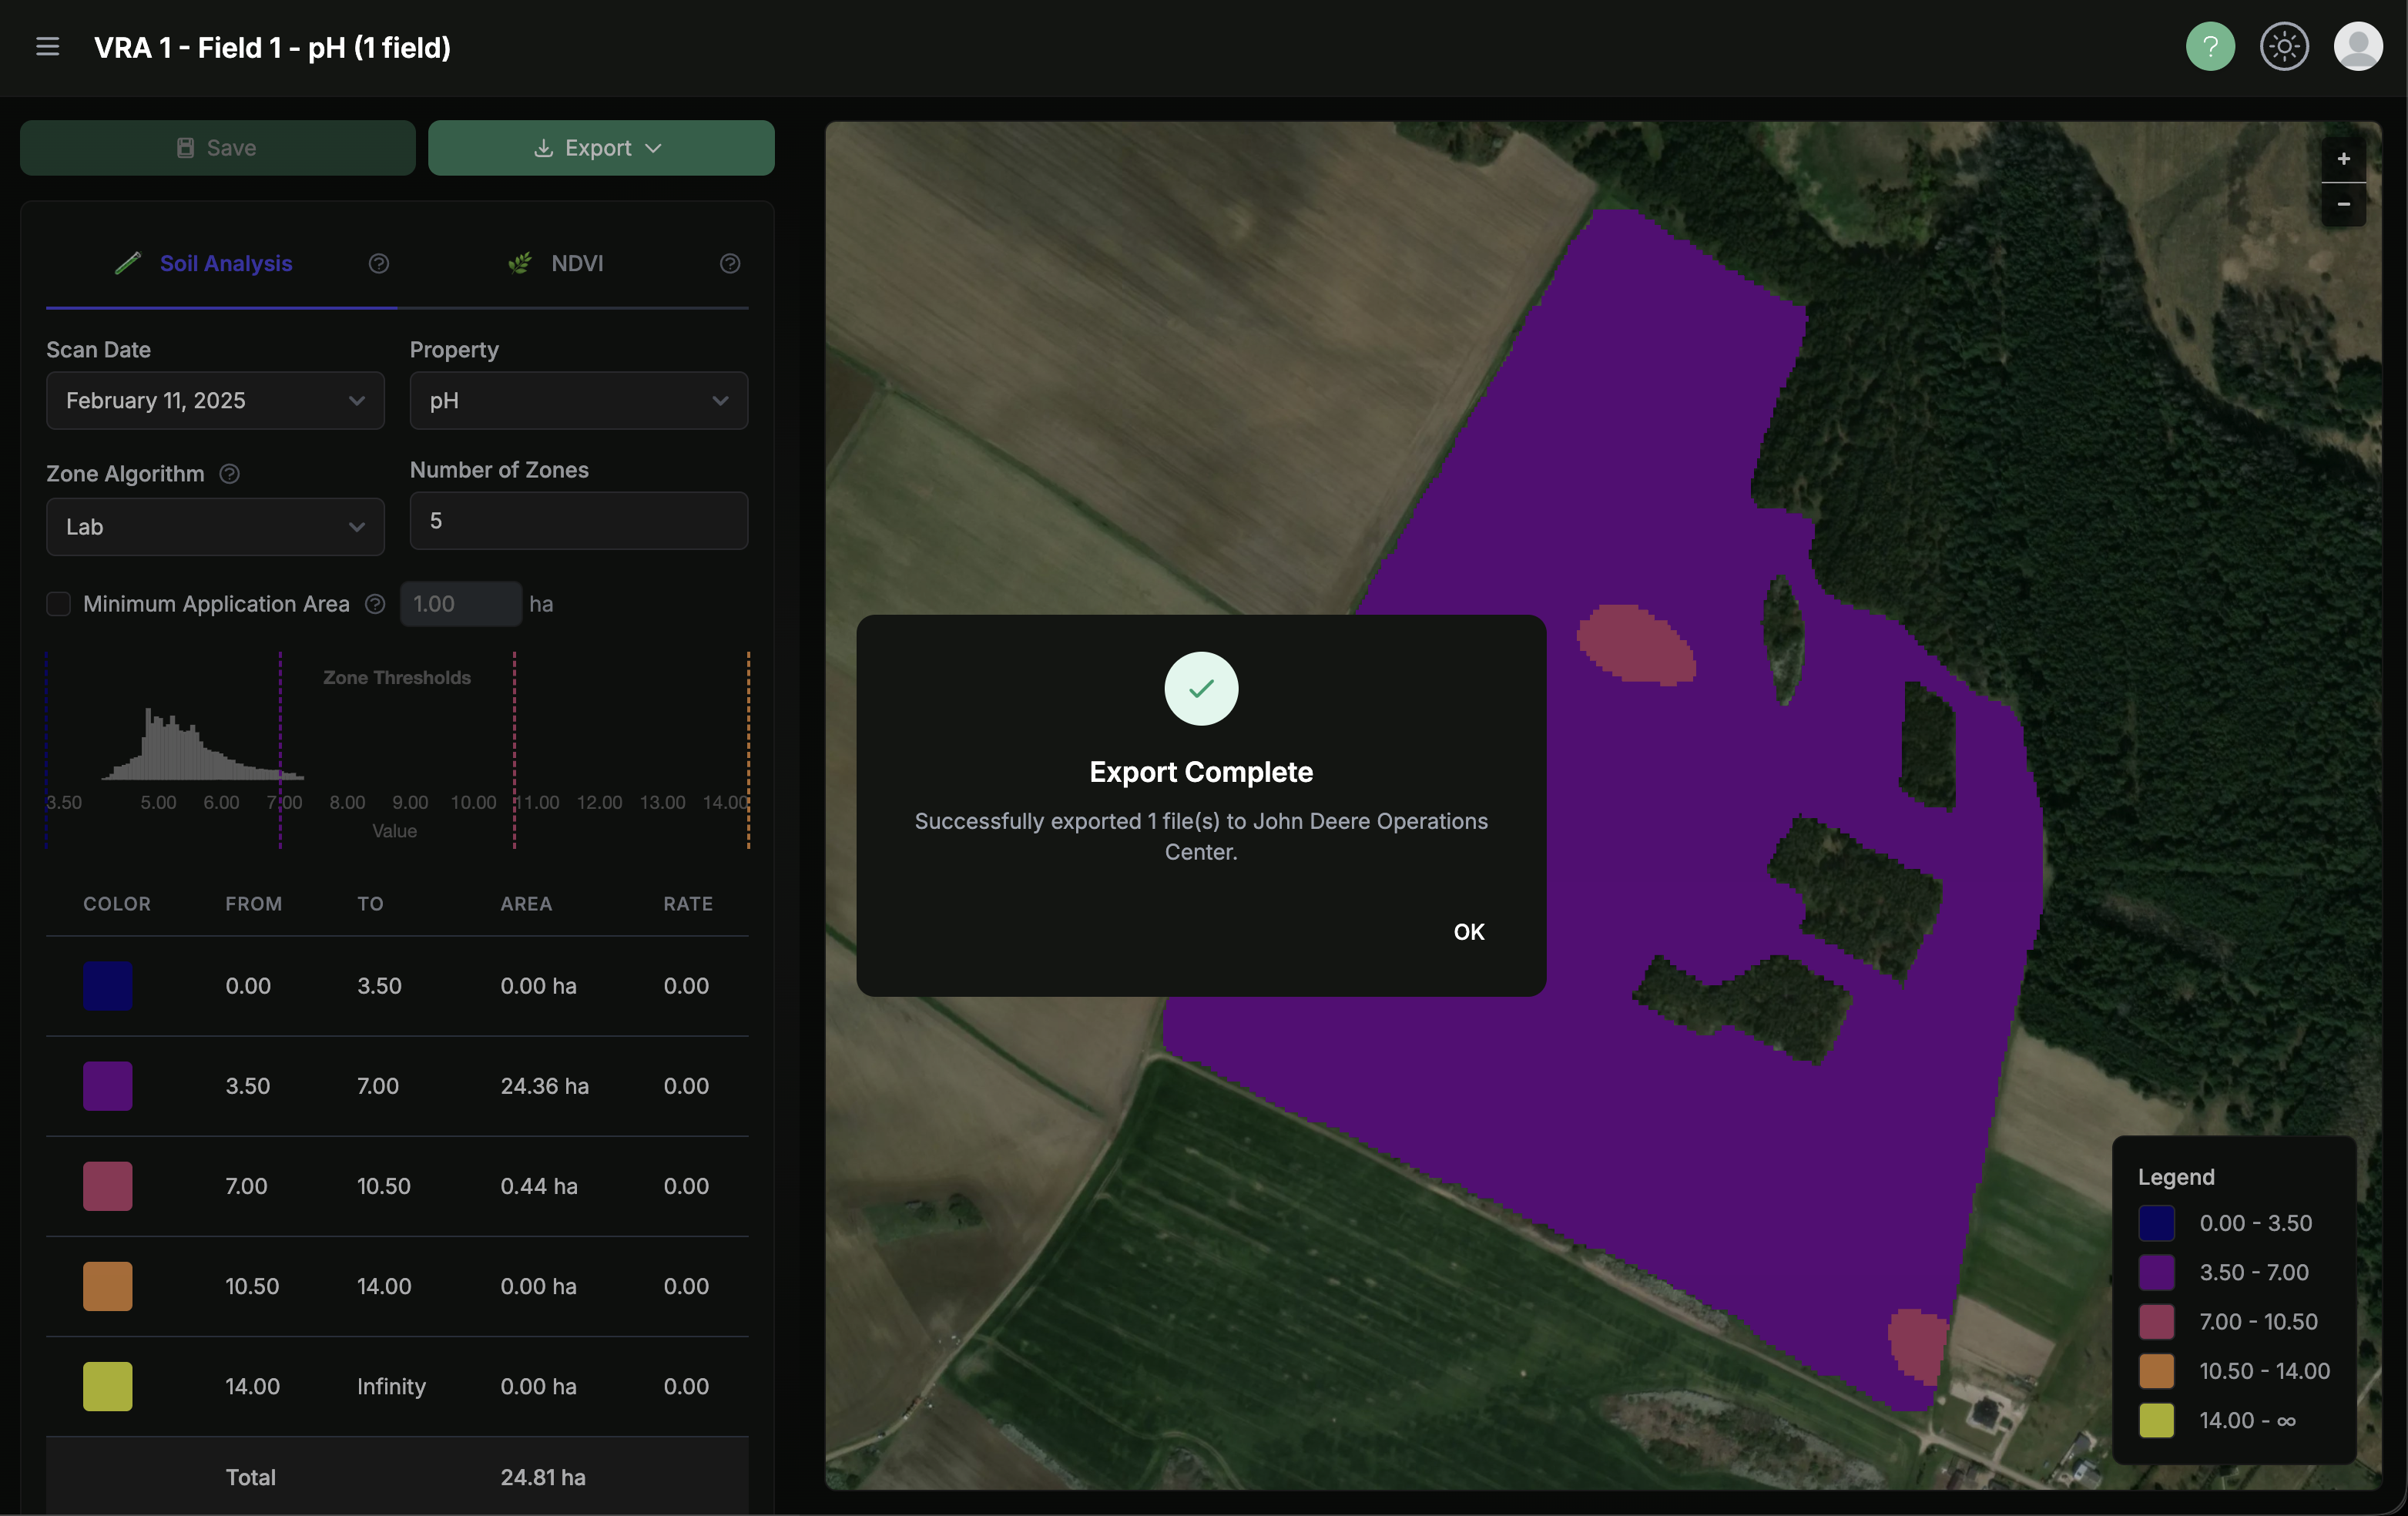
Export Recommendations
- Review zone realism before exporting.
- Check total area coverage and rate distribution.
- Confirm the receiving equipment or platform format before field use.
AI Advisor
AI Advisor is available inside Field Intelligence as a professional AI agronomy and decision-support system.
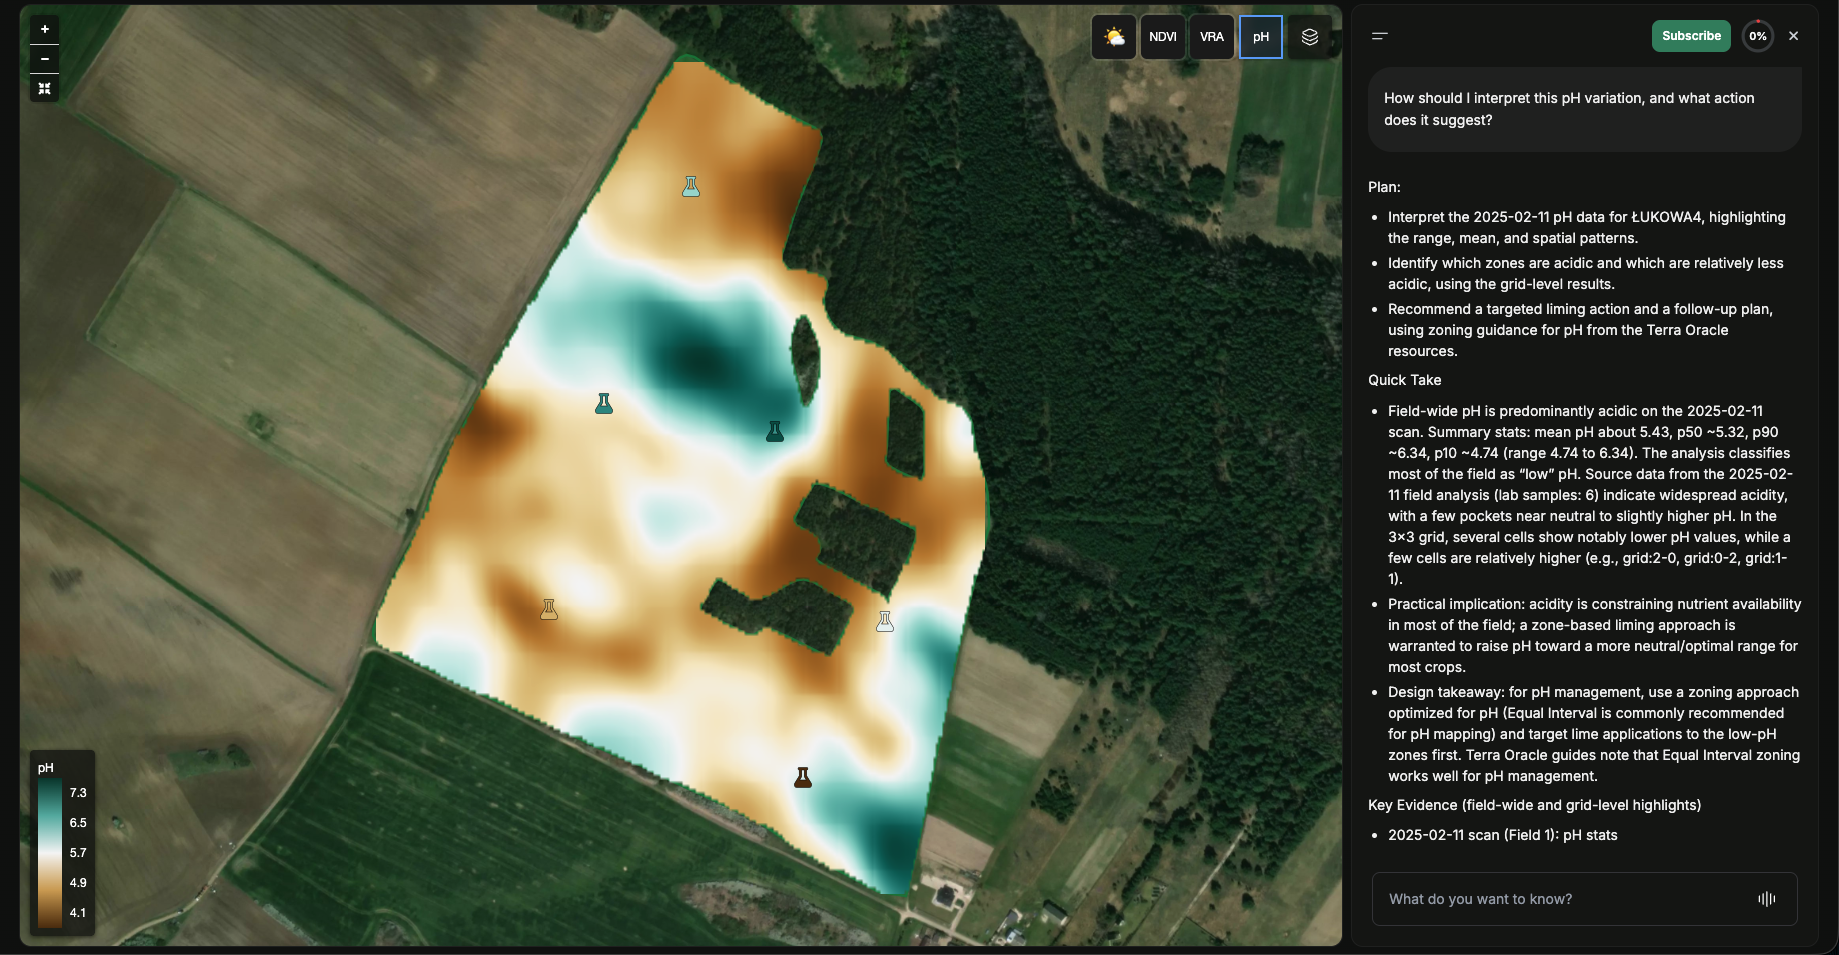
What AI Advisor Helps With
- Translating soil, satellite, weather, and operational data into clear, explainable agronomic decisions
- Interpreting field conditions, variability, and likely agronomic drivers
- Comparing layers and identifying actionable patterns across the field
- Recommending field operations and next agronomic actions
- Supporting VRA planning, field monitoring, and in-season decision-making
Typical Questions to Ask
- “How should I interpret this pH variation, and what action does it suggest?”
- “What stands out when I compare NDVI, soil, and weather patterns in this field?”
- “What field operations would you recommend based on the current conditions?”
- “Which areas should I prioritize before creating a VRA plan?”
Voice Mode
Voice mode is available in supported browsers.
To use it:
- Open AI Advisor.
- Switch to voice mode if available.
- Allow microphone access when prompted.
- Continue with text chat if voice is unavailable on your device or browser.
Availability and Billing
AI access depends on:
- Your account permissions
- Your organization’s active AI subscription
- Available AI Credits
If the AI subscription is not active, AI Advisor is unavailable. If credits are depleted, AI actions may pause until the balance is renewed or topped up.
Field Monitoring and AI-Enabled Alerts
Field monitoring and related alerting are part of the AI-enabled experience. Notification delivery and alert preferences can be configured from Account Settings > Notifications.
Account Settings
Open Account Settings from the sidebar or user menu.
Notification preferences, push devices, and delivery settings are managed from Account Settings > Notifications.
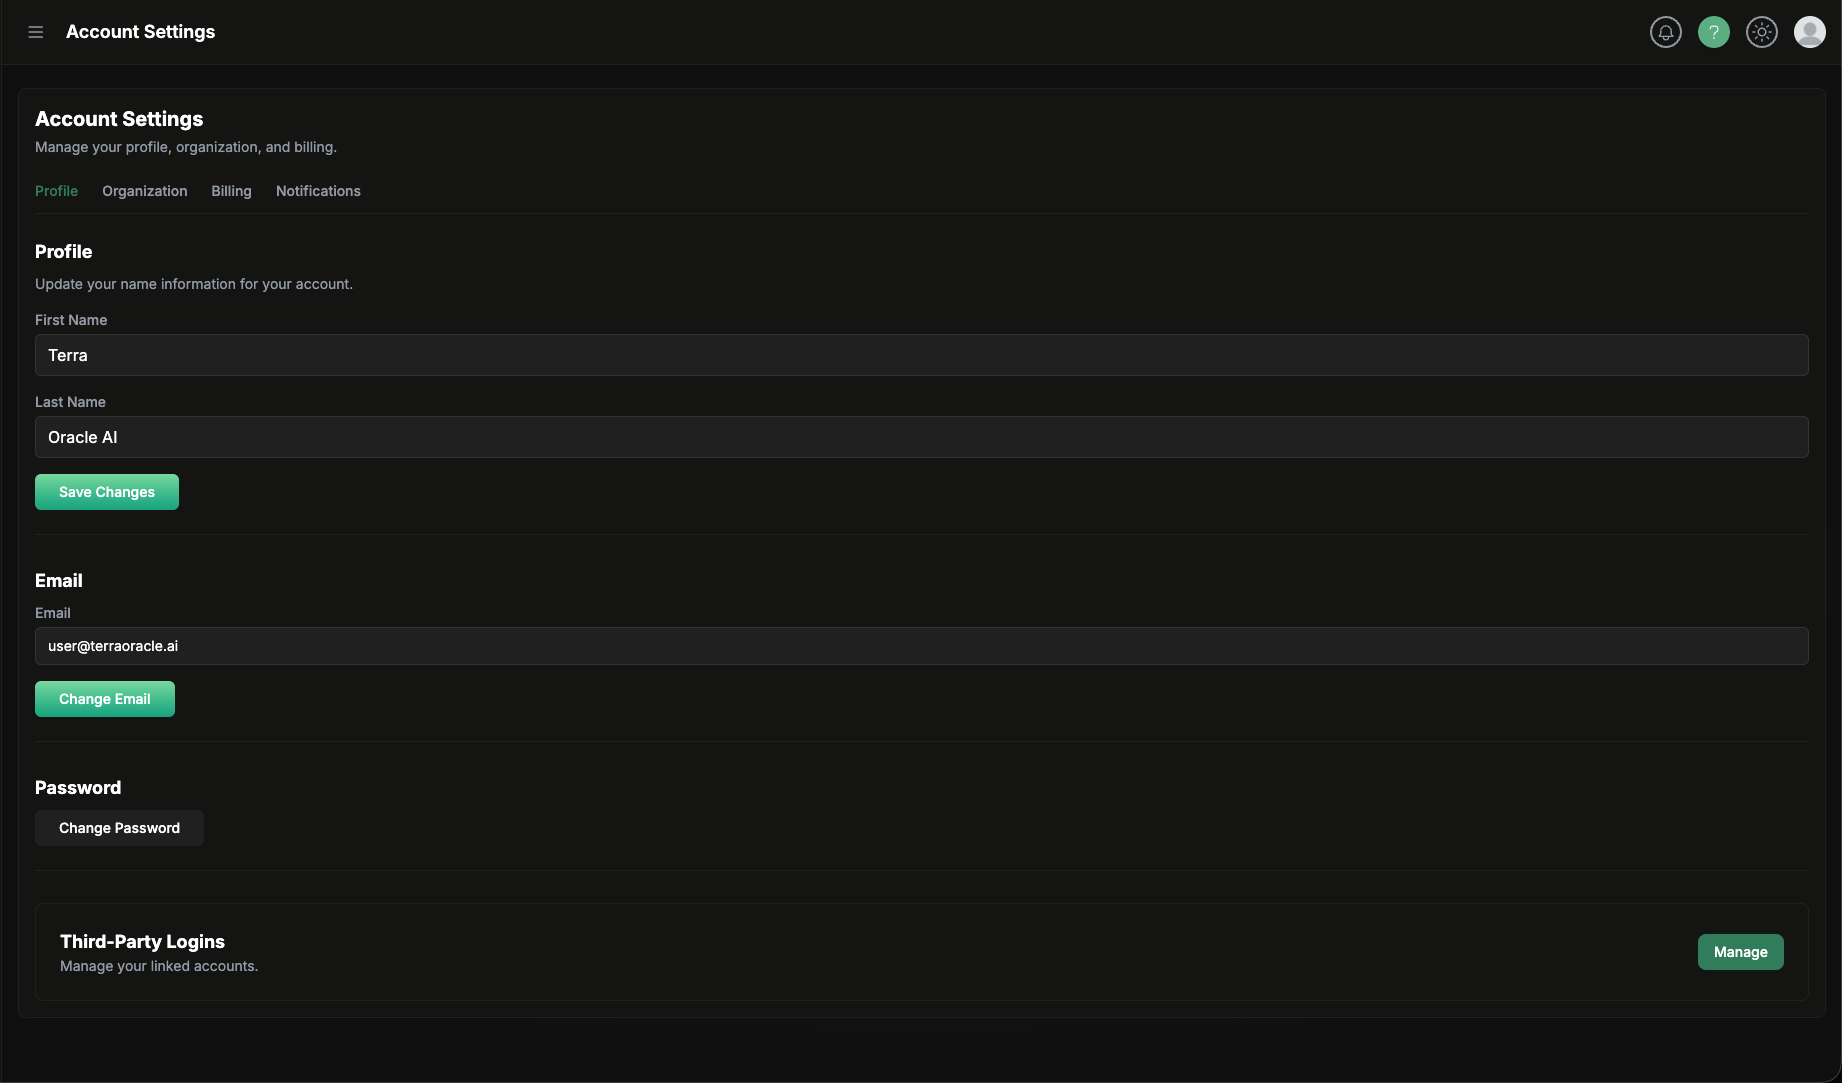
Profile
The Profile area includes:
- Identity details
- Email and password actions
- Third-Party Logins
Use Third-Party Logins to manage connected accounts such as:
- John Deere
- CNH
This is the starting point for connected workflows like field import, operations synchronization, and supported export actions.
Organization
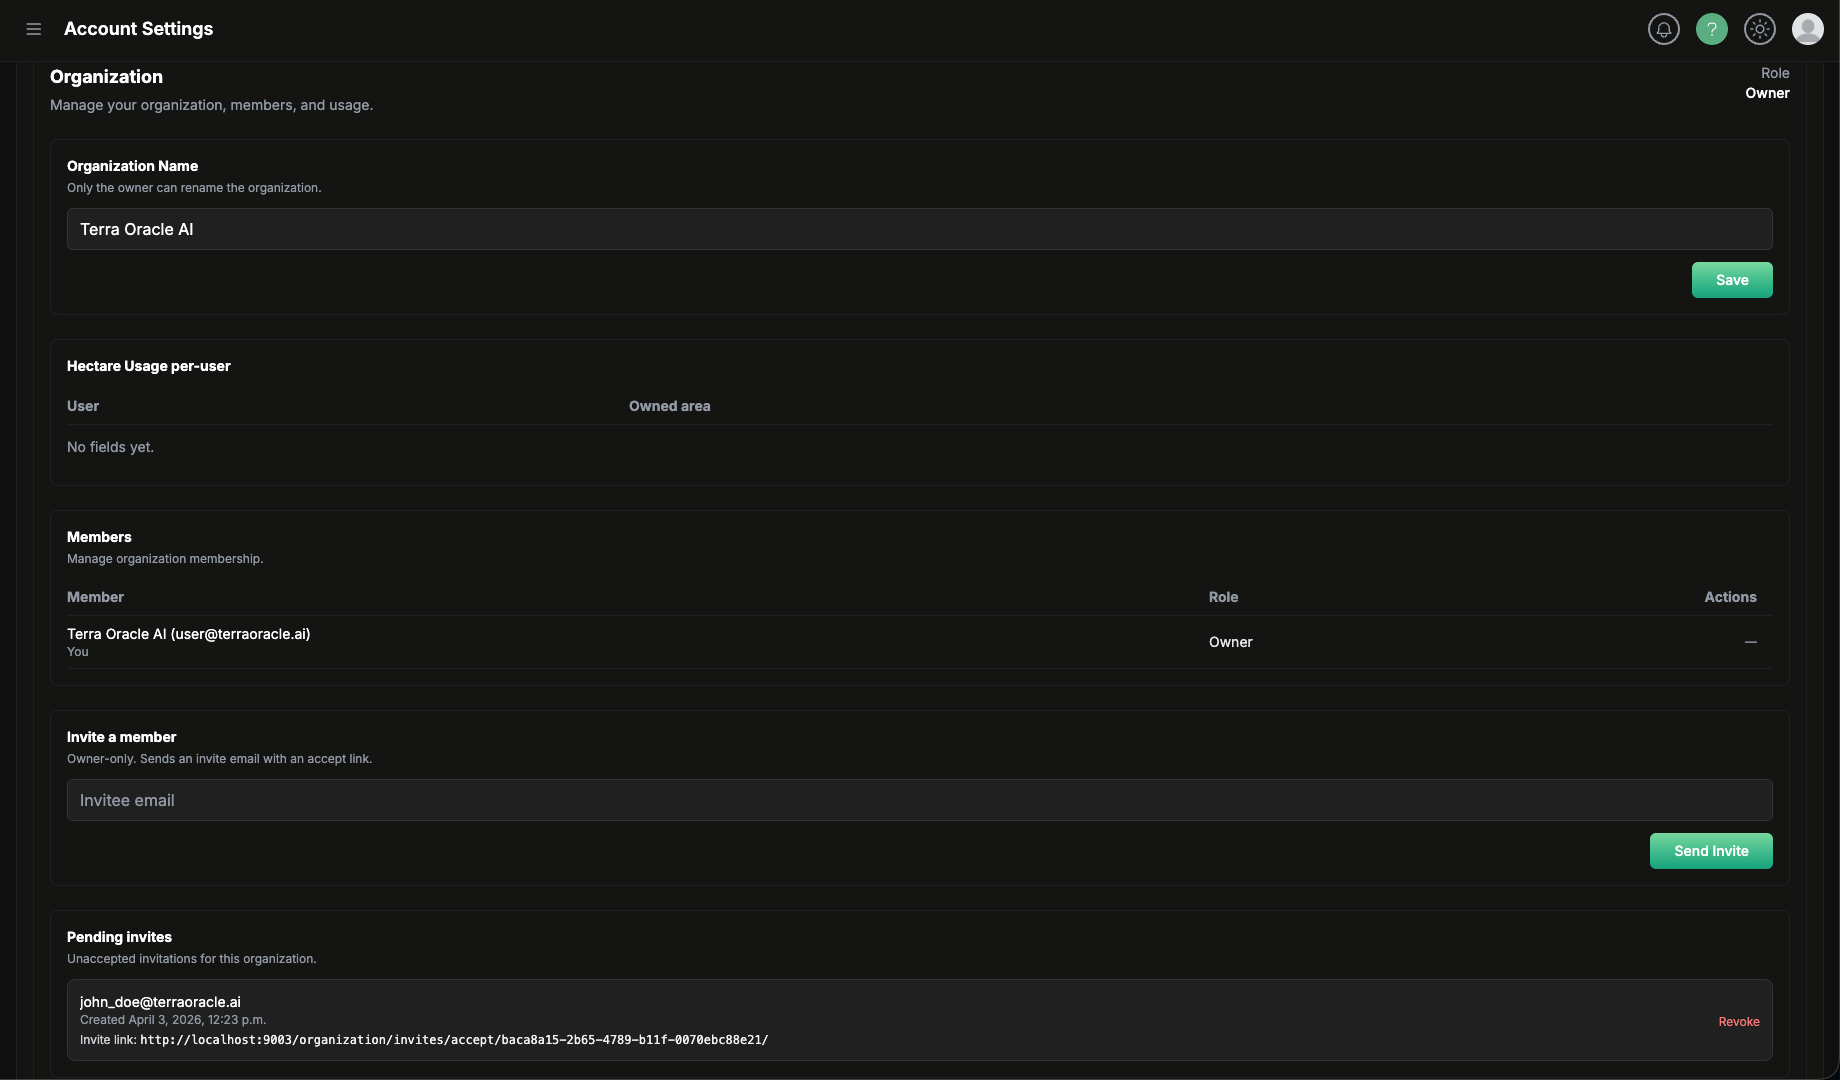
The Organization tab is where teams are managed.
Typical organization actions include:
- Reviewing your role as owner or member
- Renaming the organization
- Viewing members
- Inviting colleagues
- Revoking pending invites
- Removing members
- Transferring ownership
- Leaving the organization
Invite Colleagues
- Open Account Settings > Organization.
- Enter the colleague’s email address.
- Click Send Invite.
- The invited user accepts the invite from the link they receive.
Revoke a Pending Invite
- Open the Pending invites area.
- Find the invite.
- Click Revoke if the invite should no longer be used.
Transfer Ownership
- Open the Members list.
- Choose the member who should become the new owner.
- Use Make owner.
- Confirm the transfer.
After the transfer, the new owner can manage organization billing and owner-only actions.
Leave an Organization
Members can leave the organization from the organization tab. If you leave, your account returns to your personal organization context.
Billing
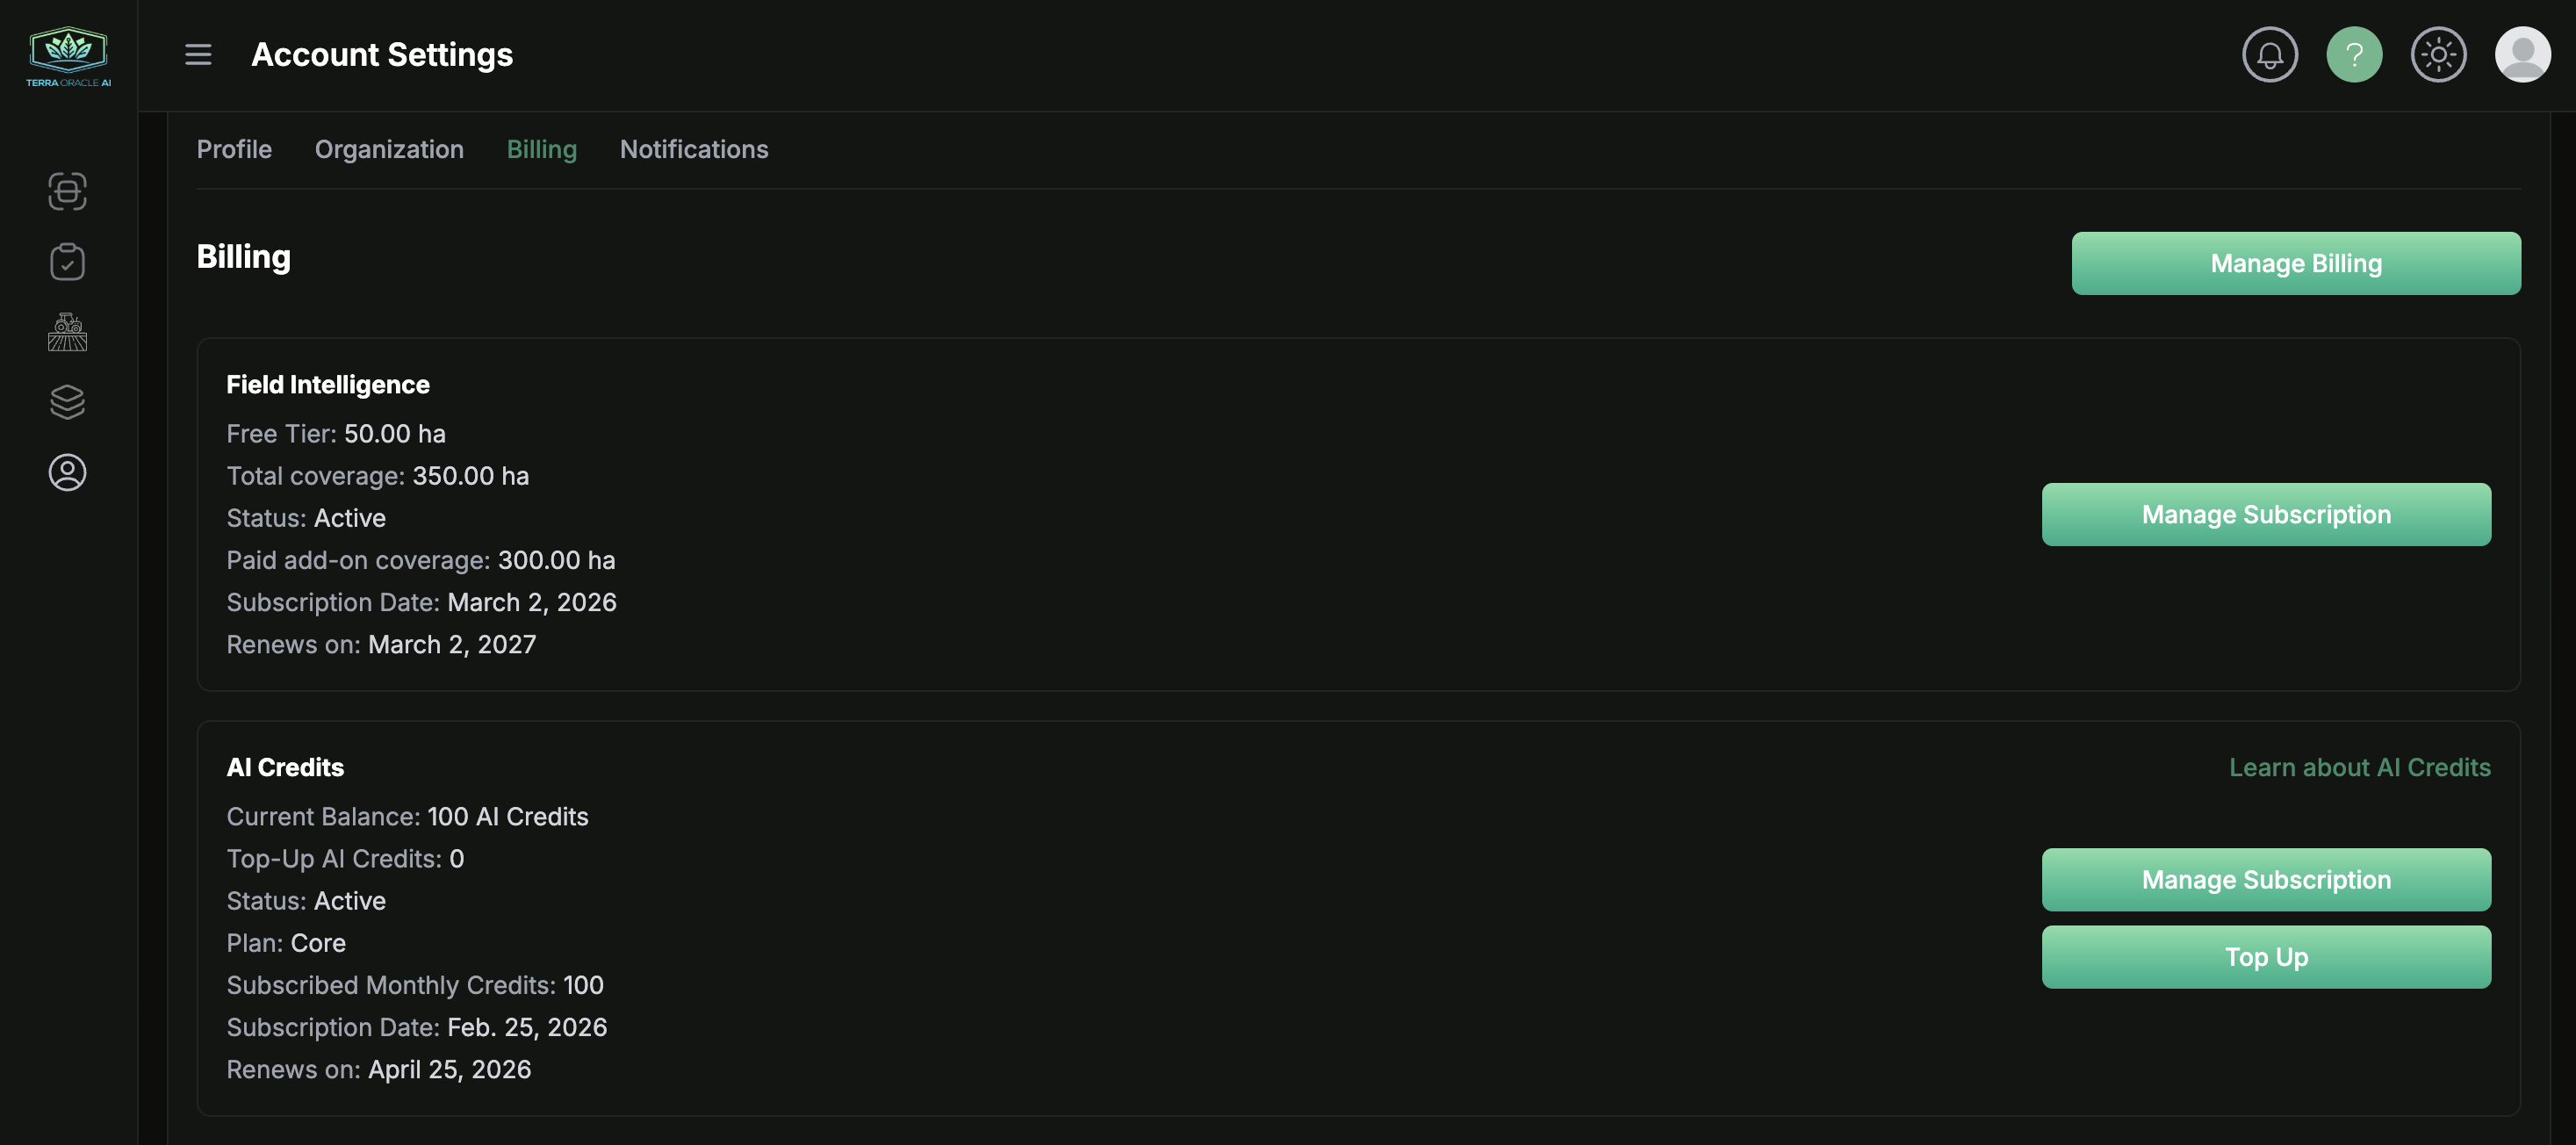
The Billing tab is where organization owners manage product subscriptions, covered hectares, and AI credit usage.
Field Intelligence Packages
Field Intelligence billing is based on coverage. The billing area can show:
- Free tier coverage
- Total covered hectares
- Subscription status
- Paid add-on coverage
- Renewal or end date
The platform includes a free Field Intelligence allowance up to a limited number of hectares. If your organization needs coverage beyond that allowance, the owner can subscribe to additional Field Intelligence coverage from this area.
AI Credits
AI billing is managed separately from Field Intelligence coverage, and AI Advisor requires an active AI subscription.
The billing area can show:
- Current AI Credit balance
- Top-up AI Credits
- Plan details
- Monthly included credits
- Renewal or end date
Owners can:
- Subscribe to an AI plan
- Re-subscribe to a plan
- Manage billing through the billing portal
- Top up credits when that option is enabled
Sign Out
Use the top-right user menu and select Sign out.
Notifications
Notifications help you stay informed about activity in the portal, field monitoring updates, and related account events.
Open Account Settings > Notifications to manage notification preferences, push devices, and delivery settings.
Notification Channels
Depending on your configuration, notifications can be available through:
- Alerts (in app)
- Push Notifications
Notification Preferences
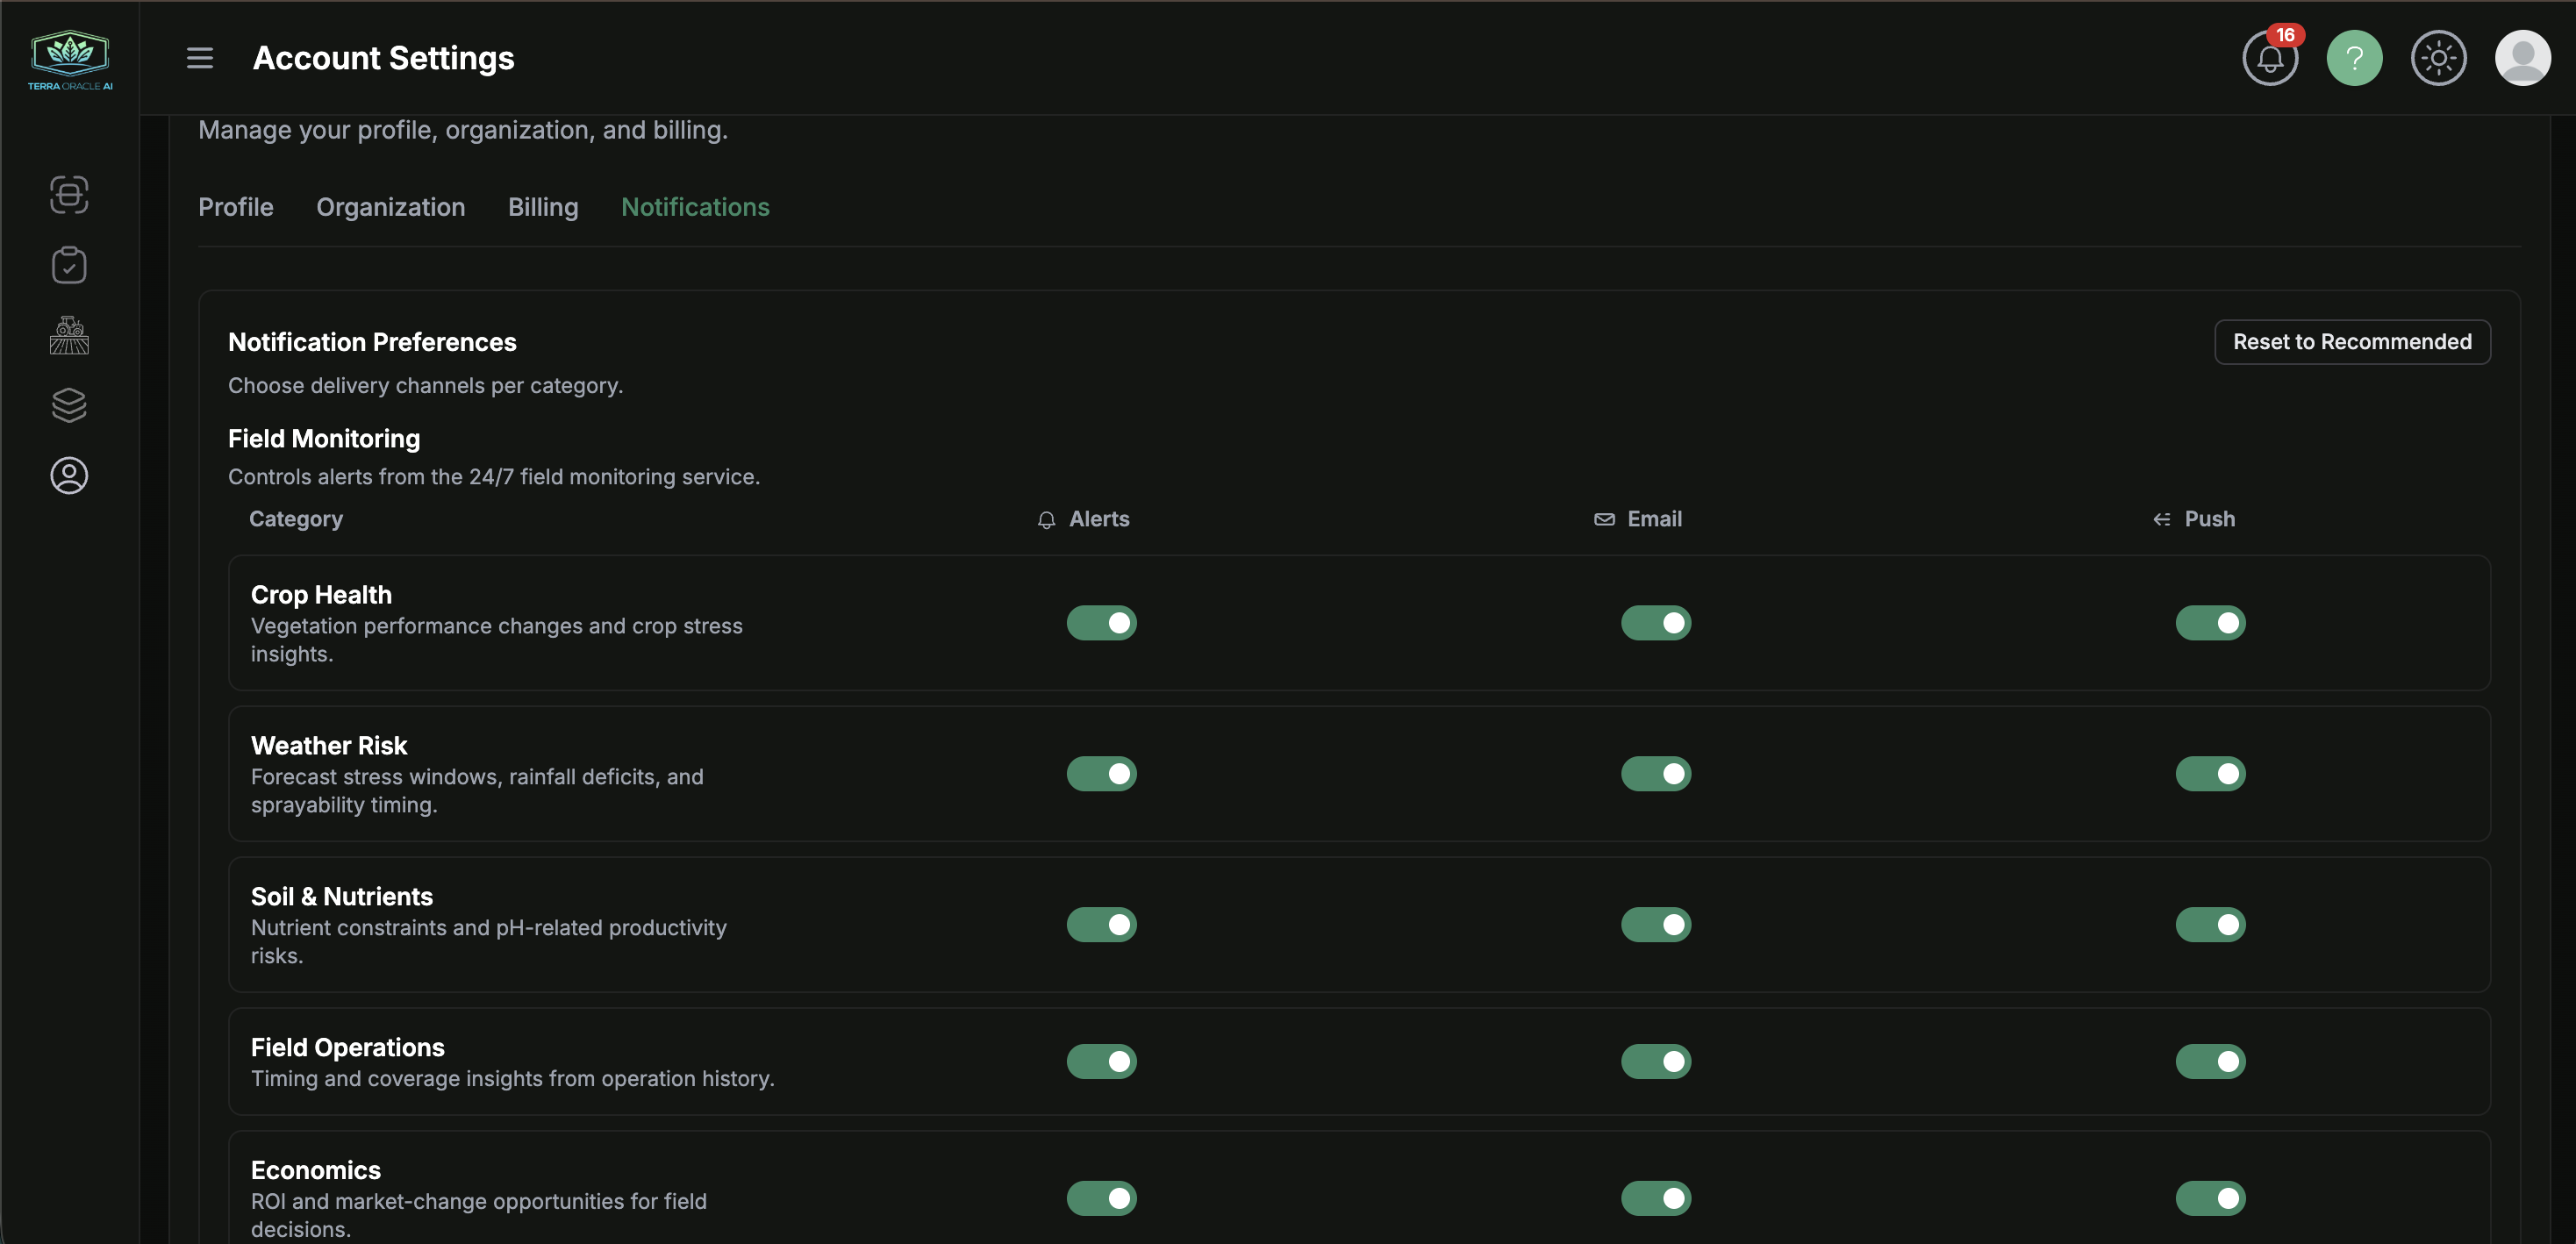
Open Account Settings > Notifications and use Reset to Recommended when you want to restore the suggested defaults.
You can enable or disable delivery channels per notification category for both Field Monitoring and General Notifications.
Field Monitoring
Field Monitoring controls alerts from the 24/7 field monitoring service.
Available categories include:
- Crop Health: Vegetation performance changes and crop stress insights.
- Weather Risk: Forecast stress windows, rainfall deficits, and sprayability timing.
- Soil & Nutrients: Nutrient constraints and pH-related productivity risks.
- Field Operations: Timing and coverage insights from operation history.
- Economics: ROI and market-change opportunities for field decisions.
General Notifications
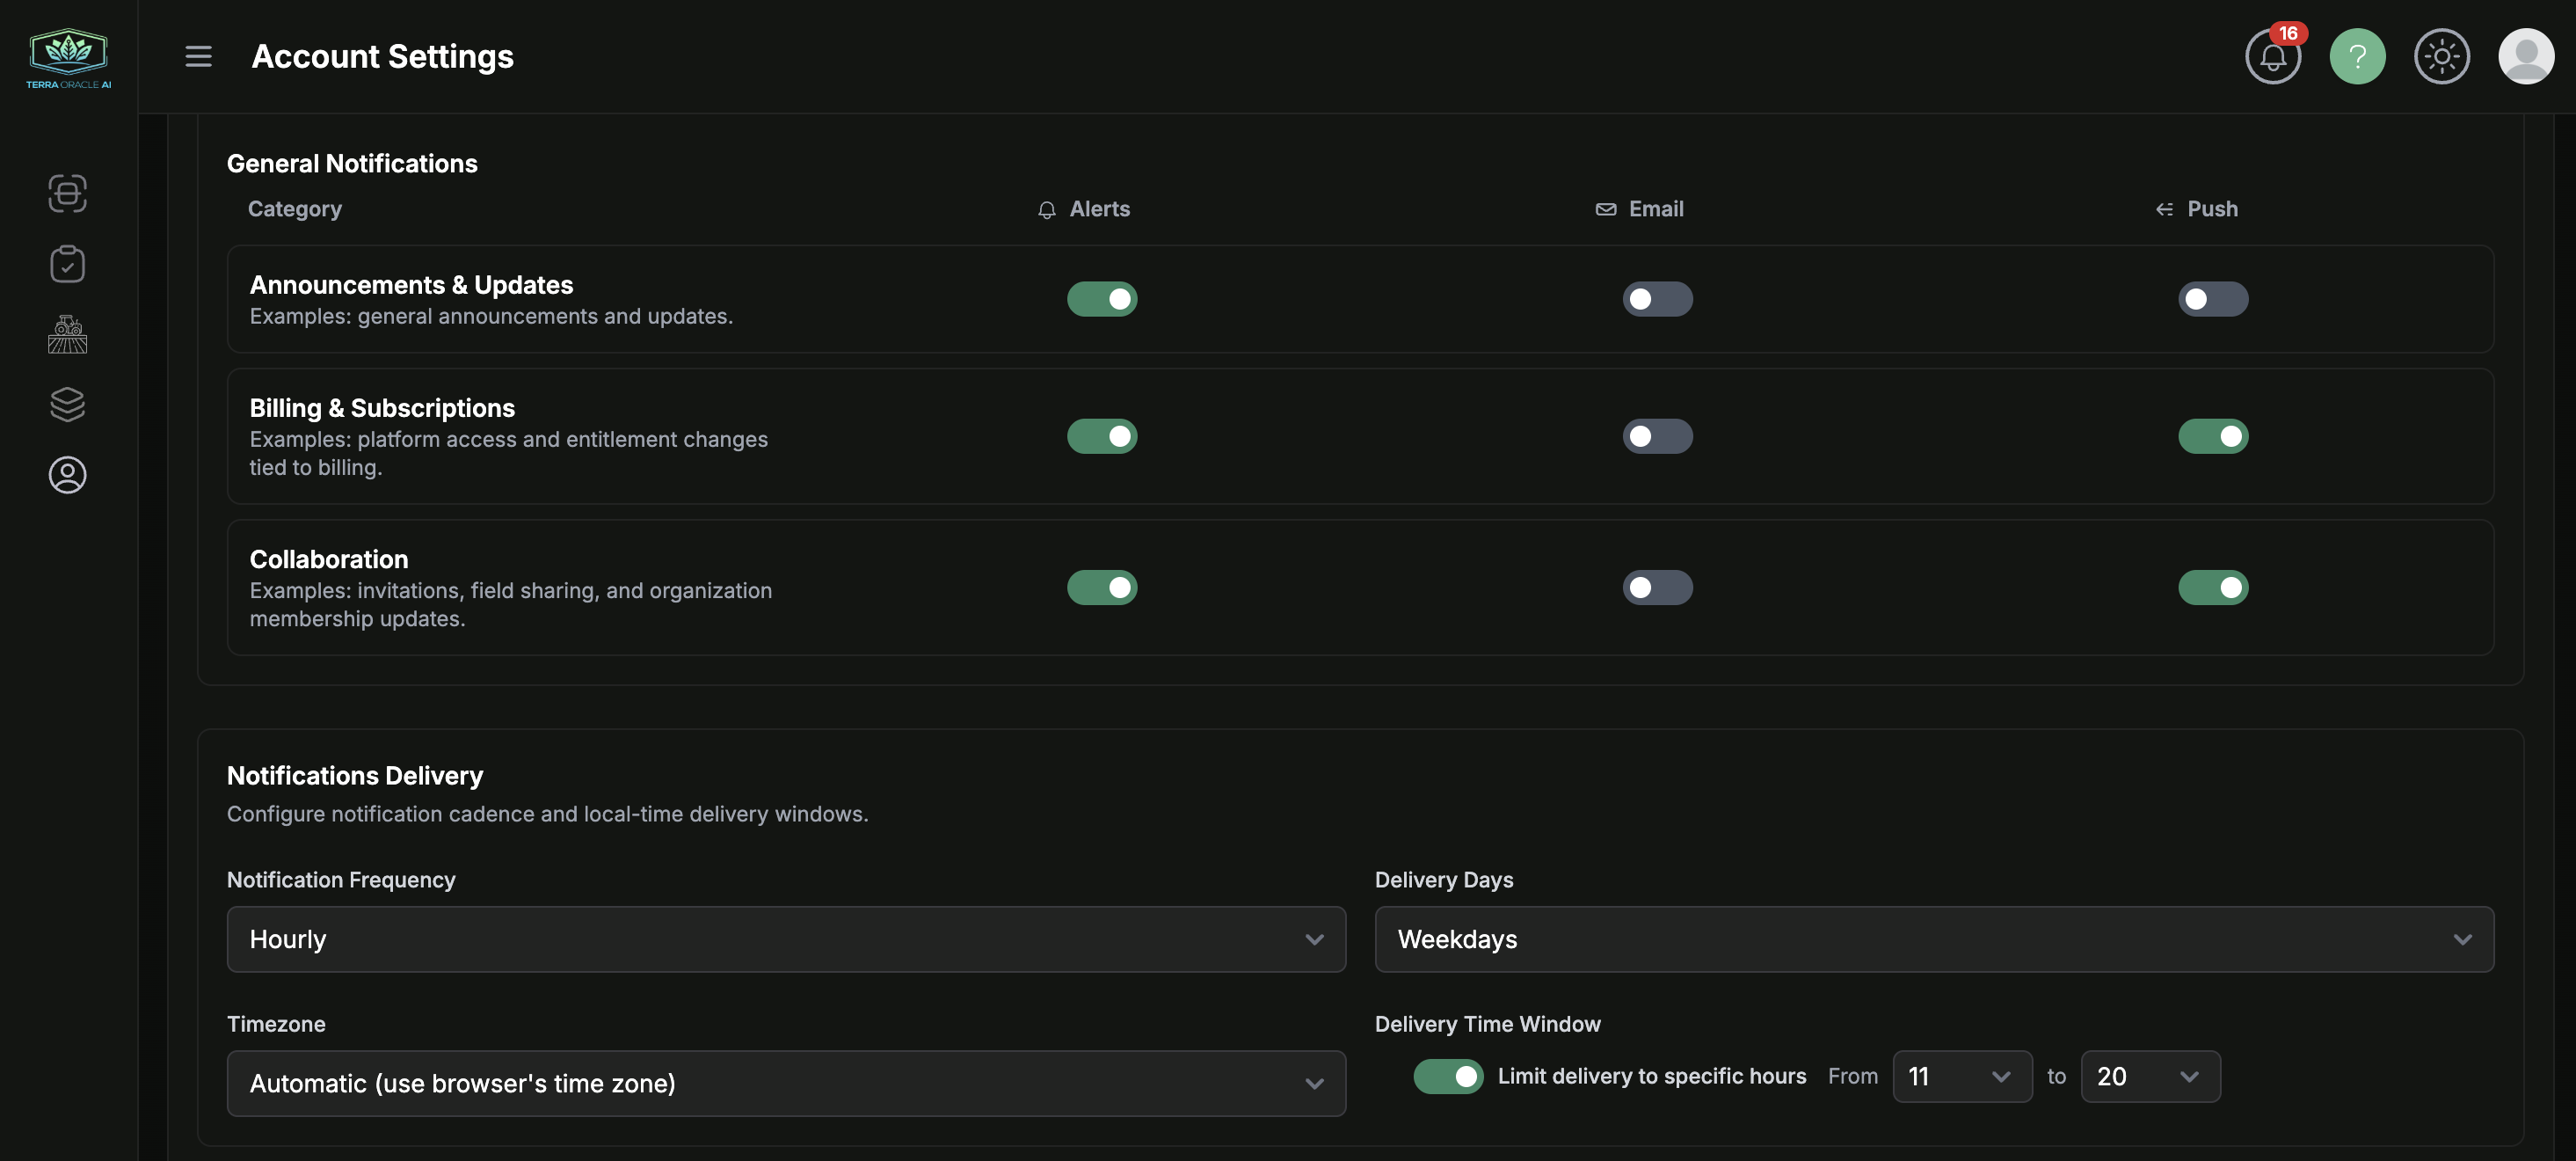
Available categories include:
- Announcements & Updates: General announcements and updates.
- Billing & Subscriptions: Platform access and entitlement changes tied to billing.
- Collaboration: Invitations, field sharing, and organization membership updates.
Channel Controls
For each category, you can control:
- Which categories are enabled
- Which channels each category uses
- Whether
Alerts,Email, andPushare enabled for that category
Push Notifications
Push notifications are device-based. To receive them on a specific device:
- Install the Terra Oracle AI application if supported on your device.
- Open Account Settings > Notifications.
- Find Push Notification Devices.
- Click Subscribe This Device.
- Approve the browser or operating system notification permission prompt.
Push notifications work best when the Terra Oracle AI application is installed on the device.
Notification Delivery Settings
Notifications Delivery lets you configure notification cadence and local-time delivery windows.
You can configure:
- Notification frequency
- Delivery days
- Time zone
- Delivery time window
These settings define how your notifications are delivered across the portal.
Notification Recommendations
- Enable push on the devices you actually use in the field.
- Keep email enabled for important workflow continuity.
- Review field monitoring categories carefully so alerts match your operational needs.
Troubleshooting
Sign-In and Access Issues
Problem: I can sign in, but the portal redirects me before I can continue
- Complete email verification if prompted.
- Accept the latest terms if redirected to a terms page.
- Try signing out and signing back in after completing those steps.
Problem: I cannot use organization or billing actions
- Confirm whether you are an organization owner or a member.
- Check that you are working in the correct organization context.
App Installation and Push Issues
Problem: I do not see an install option
- Try a supported browser such as Chrome, Edge, or Safari.
- Refresh the page and try again.
- On mobile, look for Add to Home Screen in the browser menu.
Problem: Push notifications are unavailable on this device
- Install the Terra Oracle AI application if your device supports it.
- Confirm browser and operating system notification permissions are enabled.
- Try another supported browser or device if push is not available.
Field and Upload Issues
Problem: Upload fails or does not submit
- Confirm the file type matches the selected upload mode.
- For external uploads, include the required file type for that workflow.
- Retry on a stable network.
- Refresh and reattempt in an up-to-date browser.
Problem: A scan is not ready for viewing
- Wait for processing to complete.
- Confirm the required data was provided.
- Review the scan status and uploaded files.
Problem: I cannot open analysis from a scan
- The scan may not be ready yet.
- The field association may still be missing or incomplete.
Field Intelligence Issues
Problem: A layer is missing
- Verify you selected the correct field and scan.
- Confirm that the relevant data exists for that field.
- Check whether your package or enabled services cover that feature.
Problem: The workspace feels slow or crowded
- Reduce the number of active side-by-side comparisons.
- Reload the page after recent processing completes.
- Use a desktop browser for heavier analysis sessions.
VRA Issues
Problem: Zones look fragmented or impractical
- Review the selected zoning method.
- Use minimum application area where appropriate.
- Compare outputs before finalizing.
Problem: The export does not match what my equipment expects
- Confirm the required import format in the receiving platform.
- Re-check the export type before field use.
- Contact support if you need help validating the output workflow.
AI Advisor Issues
Problem: AI Advisor is unavailable
- Check whether your account has access to the AI-enabled package.
- Review the organization’s AI Credits balance.
- Refresh the Field Intelligence page and try again.
Problem: Voice mode is not working
- Allow microphone permission.
- Confirm you are using HTTPS and a supported browser.
- Continue with text chat if voice is unavailable.
Support and Feedback
If you need help, want to report an issue, or want to share an idea or feature request:
- Click the support widget in the top-right navigation.
- Describe the issue, question, or request.
- Include supporting detail if available.
Helpful information to include:
- The page you were on
- The action you were trying to complete
- Any error message you saw
- A screenshot or screen recording
- Relevant field, scan, or VRA identifiers
Conclusion
Terra Oracle AI Portal supports a practical field-centered workflow:
- Set up your account, organization, app, and notifications
- Add or import fields and boundaries
- Upload soil and external field data
- Review weather, NDVI, soil, lab, and VRA layers in Field Intelligence
- Use AI Advisor for interpretation and decision support
- Create and export VRA plans for operational use
Use this guide as a reference for onboarding, day-to-day work, and team collaboration inside the portal.
Last Updated: April 2026
Version: 3.3
Platform: Terra Oracle AI Portal